Thursday, December 31, 2009

My Top Food Memories of 2009


As you read this, I am flying across the country to bring in the new year in the food-lover mecca of San Francisco.  While 2009 was a hard year in many ways, it was a wonderful year for this blog and brought me some foodie moments that have had a lasting effect on me.  My top 5 food memories of 2009, in no particular order are:
  • My anniversary at Gramercy Tavern: I went to Gramercy Tavern to celebrate my anniversary with the Significant Eater.  From the setting to service to the food to the lemon muffins the restaurant sent us home with for the next morning, the night was perfect.  For 2010, I resolve to treat others with just as much respect as Danny Meyer gives his patrons.  
  • Valentine's Day at Momofuku Ko: By some stroke of Cupid, I was able to secure a Valentine's Day reservation at David Chang's 12-seat, 10-course prix-fixe restaurant.  The restaurant was worth the hype (but maybe not the painful internet-only reservation policy).  My favorite dish of the night was the fluke with buttermilk, soy & poppy seeds, the recipe for which appears in the Momofuku cookbook.  I have resolved to make this recipe at home in 2010. 
  • My birthday at Maialino: Although my visit to Maialino on my birthday was only two weeks ago, it would have been just as memorable had it been twelve months ago.  The restaurant showed hardly any signs that it was two months old.  I resolve to return to Maialino in 2010, when I suspect the restaurant should really be hitting its stride. 
  • Black Squid Ink Risotto for the Significant Eater's Birthday: I cooked this risotto on the Significant Eater's birthday this year.  It was one of the more ambitious dishes I've ever cooked, and the results could not have been any better.  For 2010, I resolve to use up all the squid ink that's still sitting in my refrigerator. 
  • Gnocchi, My First Attempt at Pasta: The execution may not have been perfect, but in making ricotta gnocchi this year, I overcame my fear of making pasta.  For 2010, I resolve to try my hand at pasta more than once. 
I wish you all a New Year full of happiness! Eat, drink, and be merry!


Wednesday, December 30, 2009

Game Hens in an Indian Apricot Sauce


This recipe, adapted from Julie Sahni's Classic Indian Cooking, proves that fruit-based savory sauces don't always have to be cloyingly sweet.  The apricots make the dish pleasantly tart and the garam masala and ginger give some spice.  Serve it with plenty of Basmati rice. 

Game Hens Braised in Fragrant Apricot Sauce
Adapted from Classic Indian Cooking

Ingredients:
  • 2 game hens, skinned and cut in half through the breast bone
  • 1 cup dried apricots
  • 5 tbsp clarified butter or vegetable oil
  • 1 yellow onion, finely diced
  • 1 tbsp ginger, minced
  • 2 tsp garam masala (store-bought or homemade)
  • 3/4 cup canned chopped tomatoes
  • 1 1/4 tsp salt
Directions:
  1. Place the apricots in a small bowl.  Pour boiling water over the apricots, covering them by 1-inch.  Let the apricots soak for two hours.  
  2. Drain the apricots and finely chop them.  Set them aside.
  3. Preheat the oven to 375F. 
  4. Heat a large skillet over medium-high heat.  Add 2 tbsp of clarified butter and cook the game hens until well-browned on each side, 6 to 8 minutes total.  If necessary so as not to crowd the pan, brown the game hens in two batches.  Once cooked, place the game hens in a casserole dish large enough to hold them in one layer.  
  5. Add the remaining clarified butter to the skillet.  Add the onion and cook until it turns light brown, stirring constantly to prevent burning.
  6. Add the ginger to the skillet and cook until fragrant.
  7. Stir in the garam masala to the skillet and cook for a few seconds.
  8. Add the rest of the ingredients to the skillet, plus 3/4 cup water.  Bring the mixture to a boil, then reduce to a simmer.  Cook until the sauce reduces to a thick puree, approximately 10 minutes.  Remove the skillet from the heat. 
  9. Pour the apricot mixture over the game hens.  Pour 1/4 cup of water down the sides of the casserole dish and cover it with foil.
  10. Place the casserole dish in the 375F oven and cook for 25 minutes.  
  11. Reduce the oven to 325F and cook for another 25 minutes.  Serve immediately or refrigerate for up to two days.

Tuesday, December 29, 2009

The Multitude of Roast Chicken Recipes

It seems that the simpler something is, the more methods of doing it there are.  This is definitely the case of roast chicken, for which there seems to be a countless number of methods, 90% of which work.  I’ve tried stuffing the chicken with lemons a la Marcella Hazan, trussing it, leaving it untrussed, roasting at high heat, roasting at two temperatures, rubbing the bird with butter, rubbing it with just salt… you get the point.  Nearly all of those methods have turned out well. 


Thomas Keller alone has printed two methods of simply roasted in chicken in his cookbooks.  Up until now, my standby roast chicken recipe had been this one from the Bouchon cookbook in which a trussed chicken is seasoned only with salt and roasted at 450F for 45 minutes. Keller's latest cookbook, Ad Hoc at Home, contains yet another, completely different recipe for roast chicken.  In the more complicated Ad Hoc incarnation, the chicken is stuffed with garlic and thyme, trussed, seasoned with salt and pepper, rubbed with canola oil, and topped with butter (which I might add, blatantly disobeys his instructions in the Bouchon recipe), then roasted over a bed of root vegetables.  Additionally, unlike the single oven temperature in the Bouchon recipe, the Ad Hoc recipe calls for roasting the chicken first at 475F for 25 minutes, then at 400F for 40 minutes. 

So, what gives? Did Keller have some sort of roast chicken enlightenment between writing his two books?  Is one method better than the other?  You be the judge:


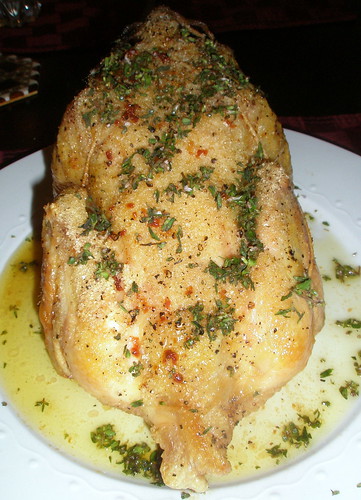
First, a chicken I roasted using the Ad Hoc at Home method the other week:


Now, here is a chicken I roasted using the Bouchon method a while back:


The Ad Hoc method may look better due to the extra browning, but both chickens were very tasty.  Without eating them at the same time, I can't say which one was better, although I will probably stick to the Bouchon method most nights for its quicker execution.  I just look at them both as two very good methods of producing the same simple thing.  


What is your favorite method of roasting chicken?

Monday, December 28, 2009

A Shameless Plug: Vote for Culinary Studio in the Homies!


Apartment Therapy's annual Homie Awards are meant to recognize its reader’s favorite “shelter” blogs, cooking blogs included.  Thanks to a nomination from yours truly, Culinary Studio is up for a Homie Award in the Home Cooking category.  If you enjoy this blog, please vote for Culinary Studio in the Home Cooking category.  And if you don’t... well, still vote for all of the sites that you do love!


You can vote for Culinary Studio via this link (just click the “add” icon next to the name of my blog). 


Thanks for your votes!

Swordfish with Orange and Olives


Sometimes, an accident can work out alright. With the above swordfish, I was attempting a recipe out of Andrew Carmellini's Urban Italian, but thanks to distraction and impatience in the kitchen, it didn't quite turn out like the recipe had called for. My improvised method did not turn out well enough to write about due to some bad shortcuts I took. With that said, the flavor profile was very interesting. Harissa, fresh orange juice, parsley, olives, marcona almonds (Carmellini calls for more pine nuts), anchovy, and lemon-- it's a combination I did not expect to go so well together, but each ingredient complemented the others nicely, giving the dish the right amount of acidity, sweetness, spice, and crunch. It's unique and well-thought ingredient combinations like this that make me appreciate the work that chefs do.
Posted by Picasa

Sunday, December 27, 2009

Short Ribs alla Genovese


These short ribs from A16: Food + Wine embody much of what this blog is all about: making the most of just a little bit. In this case, that little bit is ingredients, of which this recipe contains only a handful, and almost all of which are probably already in your kitchen. The recipe truly does make the most of these ingredients, for the braising liquid is as robust as any. Two days after the short ribs were long gone, I used the leftover braising liquid, which is chock-full of sauteed red onion, and made a meal of the liquid poured over freshly cooked polenta, once again making the most of just a few ingredients.

Short Ribs alla Genovese
Adapted from A16: Food + Wine

Ingredients:

  • 4 meaty, bone-in short ribs
  • Kosher salt
  • 4 tbsp olive oil
  • 1 1/2 cups dry red wine
  • 1 small carrot, peeled diced
  • 1 celery stalk, trimmed and diced
  • 5 anchovy fillets, minced
  • 2 cloves garlic, peeled and crushed
  • 5 black peppercorns
  • 3 red onions, thinly sliced
  • 3 tbsp red wine vinegar
  • 1 sprig rosemary

Directions:

  1. At least an hour prior to cooking, remove the short ribs from the refrigerator. Trim any excess fat from the ribs and season them well with salt.
  2. Preheat the oven to 275F.
  3. In a small saucepan, boil the wine until reduced to 1/2 cup. Set aside.
  4. Heat 2 tbsp olive oil in a large Dutch oven over medium-high heat. Add the ribs to the Dutch oven and cook until well-browned on all sides, 8 to 10 minutes. Do not crowd the ribs; if necessary, cook them in two batches.
  5. Remove the ribs from the pan and set aside on a plate. Pour out the fat from the pan and wipe out any burnt bits from the pan with a paper towel.
  6. Add the remaining 2 tbsp of olive oil to the Dutch oven and heat over medium heat. Add the carrot and celery and cook until they are soft and beginning to brown, about 5 minutes, adjusting the heat of the pan as necessary.
  7. Stir in the anchovy, garlic, and peppercorns and continue and cook for 3 minutes, stirring occasionally.
  8. Add the onions and a pinch of salt to the pan and cook until the onions are soft and translucent, 5 to 10 minutes.
  9. Stir in the reduced red wine and the vinegar with the vegetables and remove the pan from the heat.
  10. Add the short ribs to the pan, nestling them into the vegetables meat side facing down. Wedge the rosemary sprig between the short ribs.
  11. Cover the Dutch oven and place it in the 275F oven. Cook until the short ribs are tender and falling off the bone, approximately 2 1/2 hours. Serve the ribs over polenta topped with the braising liquid.

Friday, December 25, 2009

Merry Christmas!

I wish you all a very Merry Christmas with lots of good cooking and eating!

If you're still looking for a special Christmas treat to make on Christmas day for your family or for Santa, try this gingerbread recipe. It produces a very moist and very spicy gingerbread that goes very well with a glass of eggnog.


Gingerbread
Adapted from King Arthur Flour

Ingredients:
  • 2 cups all-purpose flour
  • 1/4 cup sugar
  • 1 tsp baking soda
  • 1/2 tsp salt
  • 1 1/2 tsp ground ginger
  • 1 tsp cinnamon
  • 1/4 tsp cloves
  • 1/4 tsp nutmeg
  • 1 stick butter, melted
  • 3/4 cup black strap molasses
  • 1/4 cup water
  • 1 egg
  • 1 cup buttermilk
  • 1/2 cup crystallized ginger, diced
  • whipped cream, for serving

Directions:
  1. Preheat oven to 350F
  2. Grease and flour a 9-inch square baking pan.
  3. Combine dry ingredients (except for the crystallized ginger) in a large bowl and mix well with a spoon.
  4. In a small bowl, mix together the butter and molasses. Add this mixture to the dry ingredients and stir until just moistened.
  5. Add the water to the batter and stir until the water is absorbed.
  6. In a small bowl, whisk the egg with the buttermilk. Add this mixture to the rest of the batter.
  7. Stir the crystallized ginger into the batter.
  8. Pour the batter into the pan and bake until a toothpick inserted into the middle comes out clean, about 35 minutes.
  9. Cool the gingerbread on a cooling rack for at least 15 minutes. Serve with whipped cream.

Thursday, December 24, 2009

Maialino: Excellent Italian with the Danny Meyer Touch


If only all restaurateurs had the magic touch of Danny Meyer. From New York classics like Union Square Café, to bastions of four star dining like Eleven Madison Square Park, everything he touches justifiably turns to gold. His latest restaurant, Maialino, which opened at the beginning of November in the space vacated by Wakiya at the Gramercy Park Hotel, is no exception.

Maialino has a design to match the Roman-trattoria cuisine that it serves. It may seem absurd to hire David Rockwell to design a trattoria—I’m sure that no trattorias in Italy have had so much money and thought put into their design—but Maialino’s layout is one of its many charms. The seating area by the bar has a yellow-tiled floor that is inspired by the pantheon. The main dining room has beautiful oak floors and wood-lined walls. A blue-checkered tablecloths tops each table. Each of these touches give the restaurant warmth and comfort that is inherent to all Danny Meyer restaurants and are an ironic twist for a restaurant that is housed in an Ian Schrager hotel where the Rose Bar next door has a strict door policy and serves $19 cocktails.

The prices at Maialino are wallet-friendly given the quality of food that Chef Nick Anderer, formerly of Gramercy Tavern and Babbo, is serving, with antipasti under $15, pastas under $20, and most entrees under $30. I appreciate that Danny Meyer set prices at these levels when he would have almost surely still filled tables with slightly higher prices.

The menu is full of modernized Italian favorites from spaghetti carbonara to the restaurant’s namesake dish, Maialino al Forno, a roast suckling pig for two. In classic Meyer form, I have heard that the restaurant provides diners with bread to make sandwiches at home out of any uneaten pork. Wanting to fill up on more than just pig, the Significant Eater and I decided not to order the roast pig, but we did get a taste of the pork-centric menu, selecting a starter of a rich pork terrine which was terrific when spread on Maialino’s bread, which is baked in house.

As a pasta, we chose the raviolo al uovo, a very large raviolo filled with creamy egg yolk, ricotta, and potato. When you cut into the pasta, the egg yolk runs across the plate. This was a dish I enjoyed eating in the restaurant and would love to make at home one day.

For our entrees, we ordered the a sea bass set atop greens and preserved lemon and a braised lamb shoulder served with crispy potatoes. The fish, although perfectly cooked, was the least interesting dish of all that we ordered at Maialino, but served as a nice counterpoint to the very heavy dishes we ordered for the rest of the meal. The lamb more than made up for the weak-flavored fish, with the Significant Eater and I fighting each other for the last little morsels of potatoes that had absorbed the wonderful braising liquid.

To complete our meal, we shared Maialino’s tartufo, which was nice take on the classic Italian dessert. Unlike the right-out-of-the-freezer tartufos served at so many Italian restaurants, Maialino’s is freshly made with thick chocolate shavings surrounding creamy chocolate gelato and a brandied cherry. Complements of our charming but slightly nervous waiter, perhaps as compensation for the tiny drop of wine that he spilled on our table (and promptly cleaned), we also were served a slice of olive oil cake. Not that I needed a second dessert, but I happily ate the lemony cake.

Maialino has a very nice wine list, with many choices under $40. The sommelier steered us to a Aglianico, which was robust enough to stand up to the heavy dishes we ate.

Several days after our meal at Maialino, I received a letter in the mail signed by Maialino’s general manager thanking me for my patronage and inviting me to return. It is the little touches that I love about Danny Meyer restaurants, where the staff goes beyond expectations to make diners feel welcome and appreciated. I needed no invitation to return to Maialino, for I surely will.

Maialino
2 Lexington Avenue
New York, NY 10010

Tuesday, December 22, 2009

Shrimp with Caramel Sauce


It's always nice when an ambitious-sounding meal can be created by simply using some leftover bits in the fridge. In this case, I simmered shrimp in some of the Vietnamese caramel that I had made several weeks ago for pork ribs. These shrimp are not nearly as sweet as the caramel sauce title may lead you to believe. While I do cut the cooking time from what is called for in Andrea Nguyen's Into the Vietnamese kitchen, you still need to cook the shrimp for longer than you think in order to allow the flavors of the sauce to penetrate the meat.

Shrimp Simmered in Caramel Sauce
Adapted from Into the Vietnamese Kitchen

Ingredients:

  • 1 lb shrimp, peeled and deveined
  • 1 1/2 tbsp fish sauce
  • 2 tbsp Vietnamese caramel sauce (recipe here)
  • 1 yellow onion, thinly sliced
  • large pinch of black pepper
  • 1 tbsp canola oil
  • 1 scallion, green part only, thinly sliced

Directions:

  1. In a small dutch oven, combine the shrimp, fish sauce, caramel, onion, and pepper. Bring to a rapid simmer over medium-high heat, stirring occasionally, until the shrimp are the color of clay and the sauce is almost completely reduced, about 8 minutes.
  2. Remove the pan from the heat and toss the shrimp in the oil. Garnish the shrimp with the scallion and serve with white rice.

Monday, December 21, 2009

Thomas Keller's Ad Hoc Fried Chicken

I may not have found much time to blog the last few weeks, but that didn’t stop me from caving into a recent fried chicken craving. It must have been all of the praise on the blogosphere for Thomas Keller’s buttermilk fried chicken recipe from his latest cookbook, Ad Hoc at Home, for I just could not resist making a mess of my kitchen and giving Chef Keller’s recipe a spin of my own. The mess I created and the calories I ingested were well worth it, as the fried chicken was easily the best fried chicken I have ever had. The recipe can be found all over the Internet at this point (here’s one place to find it), so I won’t type it up again, but it is worth expanding on exactly what makes Thomas Keller’s fried chicken so perfect. What I love about his recipes, as complicated and precise as they may be, is that every ingredient and every step serve a clear purpose. There are three keys to his fried chicken recipe that make it the crispiest and most succulent fried chicken I have ever tasted:
  • The Brine: Have you ever wondered why restaurant chicken and pork is so much more juicy and so much more flavorful than what you cook at home, even when you purchase the best locally-produced, pasture-raised, all-organic, massaged-by-Cretan-virgins meat you can find? It’s not because the cooks have some magic up their sleeves. Often, it’s the restaurant is using a simple flavoring technique that you can just as easily use at home: brining. By soaking the meat in a brine for 12 hours prior to cooking it, the muscle cells will absorb the liquid of the brine via osmosis. In non-scientific words, a brine makes for supremely juicy meat. Keller does one better by adding lemon halves, thyme, parsley, garlic, and honey to the brine; the chicken soaks up all of those flavors making Keller’s fried chicken reach that pinnacle of fried birds where the meat is as delicious as the crust.
  • The Crust: To ensure an exceptionally crispy and flavorful crust, Keller instructs us to dredge the chicken in two layers of seasoned flour (with buttermilk between the two layers). The key to this technique is to make sure that you shake off the excess coating so that the crust on the chicken is crispy but not too thick. Keller spikes his flour with paprika, cayenne, garlic powder, and onion powder, which all lend the crust a nice bite.
  • The Buttermilk Coating: Like many fried chicken recipes, Keller’s calls for coating the chicken pieces in buttermilk. Although the chicken has already been brined, the buttermilk coating acts almost as a second brine, sealing in all of the chicken’s juices to ensure that very little moisture escapes as it is cooked.

What I love about Thomas Keller’s recipes, as complicated and precise as they may be, is that every ingredient and every step serve a clear purpose. The Ad Hoc at Home recipe may take more time and effort to make than your average fried chicken, but in carrying it out, you will perfect the three pillars that produce the ultimate fried chicken.

Tuesday, December 1, 2009

Butternut Squash Soup

A well-spiced butternut squash soup is the perfect antidote to chilly fall weather. It's ubiqitous on restaurant menus this time of year, but it's easy to prepare at home. For the soup above, I used this recipe from Michael Chiarello, substituting store-bought garam masala for his spice rub and adding a dollop of creme fraiche to each bowl. My only other recommendation would be to try straining the soup prior to serving it, as mine had tiny bits of squash that did not get blended with the rest of the soup. Other than that, this soup was just what I've been craving all autumn long.

Monday, November 30, 2009

Braised Leek and Bacon Tart

This tart definitely ranks among the best dishes I have ever cooked. The tart recipe, along with the braised leeks that went into it, is from Molly Stevens' All About Braising. Having never made a pie crust before, I was worried how well the shell would hold up, but Stevens' instructions worked perfectly. Due to my own clumsiness, it was not the best looking crust, but it was just as flaky and flavorful as any I've had. While I used leftover braised leeks from one of Stevens' recipes, any cooked leeks should work just as well.

Braised Leek and Bacon Tart
from Molly Stevens' All About Braising


For the shell:
  • 1 cup all-purpose flour
  • 6 1/2 tbsp butter, cut into 1/2 inch pieces
  • 3 to 4 tbsp cold water
  • 1/2 tsp salt
For the filling:

  • 4 braised leeks, cut into 1 1/2 inch pieces
  • 2 tbsp braising liquid from the leeks
  • 3 slick slices bacon, minced and sautéed until slightly crispy
  • 2 large eggs
  • 1/4 cup creme fraiche
  • 2/3 cups half and half
  • 3/4 cup Gruyere cheese
  • 1 tsp thyme leaves, minced
  • ground nutmeg
  • salt and pepper, to taste
Directions:

  1. To make the shell, combine the flour and salt in a large bowl. Add the butter and stir to coat with flour. With a fork, press the butter pieces into the flour until the butter is in small, flour-coated bits. Add 3 tbsp of water and stir the mixture. Continue adding drops of water until the dough can hold together. With your hands, form the dough into a 2-inch thick disk. Wrap the disk in plastic wrap and refrigerate for at least an hour or up to two days.
  2. On a lightly floured surface, roll the dough into a 13-inch circle. Drape the dough over a 10-inch tart pan. Press it into the sides and corners of the pan, pressing from the center of the crust so that the sides are slightly thicker than the base. Cut away the excess dough that falls over the sides of the pan. Refrigerate the crust for another hour.
  3. Preheat the oven to 375F. Cover the crust in foil and weigh it down with pie weights or dried beans. Bake for 20 minutes.
  4. Remove the foil from the crust and continue to bake until it is golden in color, approximately 10 minutes. Remove the tart pan from the oven and place on a cooling rack. Reduce the oven heat to 350F.
  5. To make the filling, whisk together the eggs and creme fraiche until they are well blended. Add the cream, thyme, nutmeg, braising liquid, salt, and pepper and stir well to combine.
  6. Place the leeks in the tart shell. Top the leeks with the bacon pieces, then the cheese. Pour the egg mixture over the leeks.
  7. Bake the tart until the filling is set and the top is browned, approximately 40 minutes. The tart can be served hot, warm, or at room temperature.


Sunday, November 29, 2009

Seared Scallops over Braised Leeks


The sweet, briny flavor of sea scallops makes them pair nicely with earthy foods such as mushrooms and leeks. Last night, I served scallops that I had purchased at the Union Square Greenmarket with leeks that I simply braised in chicken broth with thyme and bacon. A good scallop needs little more than butter and maybe a squeeze of lemon, and that's exactly what I did with these scallops, which had been caught off the Long Island shore the same morning that I purchased them. The key is to dry the scallops thoroughly prior to searing them in clarified butter (clarified so that butter does not burn). Two to three minutes per side on medium-high heat is all you need to give the scallops a wonderful crust on their exteriors.

Monday, November 23, 2009

Pulled Pork Made in the Oven

For a recent office potluck, I decided to honor my Southern heritage by cooking pulled pork. While there is no substitute for wood smoked pork butt, this recipe for beer braised pork butt is as good as any pulled pork dish that can easily be cooked in a New York apartment. If the number of requests I received from my co-workers is any indication, they agreed. The recipe is quite simple, it just takes the better part of an evening to make.

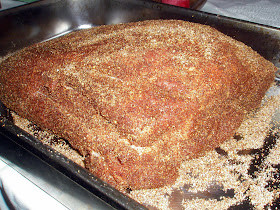
First, rub the bone-in pork butt in the spice mixture. A store-bought spice rub will do, but it's best if you make your own. The rub prescribed in the recipe lends the meat a smoky flavor that gives the dish slight semblance to authentic smoke pork. Let the pork marinate for at least an hour, preferably overnight. Before you are ready to cook the pork, let it come to room temperature.


Next, preheat the oven to 500F. Roast the pork until the pork blackens.


Remove the pork from the oven and reduce the heat to 325F. While the oven is cooling down, pour a 12 oz. dark beer over the pork and have one for yourself. I used Peak Organics Brown Ale. Surround the pork with several cloves of minced garlic. Finally cover it with heavy foil and poke several holes all over the foil to let some liquid escape. Let the pork braise until it is falling off the bone, about 2.5 hours. Remove the pork from the roasting pan and pour the braising liquid into a sauce pan.

Perfecting the braising liquid is key here as it will make for wonderfully moist meat. Add the ketchup, Worchestershire sauce, brown sugar, and dijon mustard to the liquid and let it simmer for about 20 minutes. Meanwhile, shred the pork with two forks:


Finally, mix as much of the liquid as desired back into the pork. It will look like too much liquid, but keep stirring it into the pork, as the meat will absorb lots of the braising liquid.


Serve the rest of the braising liquid with the pork. The pork is delicious by itself or a sandwich on a potato roll with cole slaw.

Monday, November 16, 2009

Braised Pork Shoulder with Cardamom & Ginger

Cooking can be at its most fun when you don't give a damn. It can also be at its most educational. With a good combination of ingredients and good technique, a recipe doesn't need to offer any more than a little inspiration. This pork dish was inspired by a recipe I came across in Molly Stevens' All About Braising, while looking for ways to cook a pork shoulder roast I had purchased at Whole Foods. Stevens' recipe called for dried apricots to be added to the sauce, but being the lazy Sunday that it was, I decided against a second trip to the store to purchase apricots. Eventually, my straying from Stevens' recipe turned into all-out rebellion. It's a very loose interpretation of the original recipe, but it worked and I had fun preparing it.

Braised Pork Shoulder with Cardamom & Ginger
Serves 6

Ingredients:

  • 1 5 lb boneless pork shoulder roast, trimmed and tied with butcher's twine into a neat log
  • 1 tbsp ginger, minced
  • Salt and pepper, to taste
  • 2 tbsp olive oil
  • 1 yellow onion, finely chopped
  • 2 carrots, finely chopped
  • 2 celery stalks, finely chopped
  • 3 garlic cloves, minced
  • 1 tbsp ground cardamom
  • 1/2 tsp ground turmeric
  • 1.4 tsp ground cayenne pepper
  • 1 bay leaf
  • 2 tbsp brandy
  • 1/2 cup dry vermouth
  • 2 cups chicken broth
  • 1/4 cup cilantro leaves, minced
Directions:

  1. Preheat the oven to 300F.
  2. Pat the pork dry with paper towels and generously season it with salt and pepper.
  3. Heat the oil in a dutch over over medium heat. Add the pork and cook until well browned on all sides, approximately 20 minutes. Remove the pork to a plate.
  4. Pour off all but 1 tbsp of fat from the pan. Add the onion, carrot, celery, garlic, and cardamom, turmeric, and cayenne and cook until the vegetables soften and the spices are fragrant, about 5 minutes.
  5. Add the ginger and bay leaf to the pan and cook for another two minutes.
  6. Pour in the brandy and stir with a wooden spoon to stir up the brown bits on the bottom of the pan. Boil until the brandy is reduced by half, about 1 minute.
  7. Add the vermouth to the pan and cook until reduced by half, about 4 minutes.
  8. Stir in the stock and bring to a slow simmer.
  9. Add the pork to the dutch oven. Baste the pork with the braising liquid and cover the dutch oven. Place in the oven. Every 30 minutes, turn the pork and baste it with the braising liquid. Cook until the pork is very tender, approximately 2 hours.
  10. Remove the pork from the dutch oven and let it rest on a plate for at ten minutes. Meanwhile, keep the braising liquid at a simmer. The liquid should not be thick, but if it appears too watery, boil it for a few minutes until it reaches its desired consistency. Taste it for salt and pepper.
  11. Serve the pork with the braising liquid spooned on top and garnished with the cilantro.

Wednesday, November 11, 2009

Brussel Sprouts a la Colicchio


As I will be contributing a few dishes to the Thanksgiving meal that my brother and sister-in-law are hosting this year, it is now crunch time for me to perfect the items that I am planning to bring and prove my food blogging worthiness to my family. First up on my list is brussel sprouts, which I had been planning to simply pan roast with bacon. However, after coming across an interesting preparation for brussel sprouts in Tom Colicchio's Think Like a Chef, in which the brussel sprout leaves are blanched, then briefly sautéed in with bacon, I decided to see if it could improve upon the pan roasting method. While Colicchio's technique resulted in a wonderful vegetable side dish, with two blanching sessions and lots of brussel sprout leaves to separate, it is a bit too labor- and pan-intensive for Thanksgiving. For the big day, I will stick to the pan roast method. However, I will definitely keep this brussel sprouts technique in my fall repertoire as it produces perfectly tender brussel sprout leaves with no hint of bitterness.

Sautéed Brussel Sprout Leaves with Bacon
Adapted from Think Like a Chef

Ingredients:

  • 3/4 lb brussel sprouts
  • 1/4 lb bacon, diced
  • salt and pepper, to taste
Directions:
  1. Cut the base off of the brussel sprouts and cut them in half.
  2. Toss the halves into boiling, salted water and boil until the leaves begin to separate, about 3 minutes. Remove the brussel sprouts with a slotted spoon and rinse under cold water to stop the cooking process. Keep the water in the pot that was used to cook the brussel sprouts at a boil.
  3. Separate the leaves of each brussel sprouts from the core, discarding the core. Place the leaves back into the boiling water and cook until they are tender, about 3 minutes. Drain the leaves and rinse them under cold water. Blot the leaves dry with paper towels.
  4. Fry the bacon in a skillet over medium heat until the fat is rendered and the bacon is beginning to brown. Reduce the heat to medium-low and add the brussel sprout leaves. Briefly toss the leaves with the bacon and bacon fat. Taste the leaves for salt and pepper and serve them immediately.


Monday, November 9, 2009

Cook.Eat.Drink.Live

This past weekend, I had the opportunity to attend Cook.Eat.Drink.Live, "a three-day modern food and wine event at The Tunnel & La.Venue (608 West 28th Street), featuring a large sampling of ultra-premium gourmet foods and spirits, plus appearances from some of the city’s premier chefs."


The event was an interesting hodgepodge of small and mass food and wine and spirit producers, featuring stalls for companies as diverse as Qdoba, Manhattan's Xie Xie sandwich shop, Robert Mondavi Winery, and the North Fork's Lenz Winery. Despite the incongruent mix of vendors, with the disappointments outweighing the surprises, there were some gems that made the event, if not worth its $65 admission, at least a nice lunch.

Seasonal Restaurant and Weinbar won my vote for most delicious item at the event for its plate of braised veal cheeks with spaetzle. I tend to lower my expectations when eating food at events like Cook.Eat.Drink.Live, knowing that even the best of chefs will have trouble cooking food for the masses that must be reheated over sternos. Seasonal's rib-sticking dish would have made me happy in any surroundings.

I also enjoyed the Italian delicacies served during Lou DiPalo's (of DiPalo Dairy fame) lecture. While the information that Lou shared on the importance of celebrating the Italian food culture was fairly pedestrian, the plateful of speck, Prosciutto di Parma, Grana Padano, Parmigiano Reggiano, and Pecorino Romano was just as enjoyable as samples that Lou serves at his store.


I must have sampled wines from at least 10 Long Island and upstate wineries at the event. As is expected of New York wine, there was plenty of characterless plonk, but there were also some unique wines that showed that New York can and should be a wine region that can compete with the West Coast regions. Among my favorites were an oaked Chardonnay from the North Fork's Lenz Winery and a few dry Reislings offered by the Finger Lakes' Keuka Lake Vineyards.


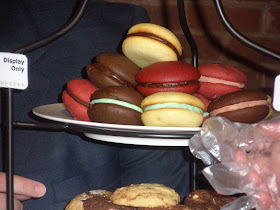
Lastly, I could not help myself from sampling two of the desserts on hand at the event. As always, a filled to order cannoli from Ferrara was a delight and the whoopie pies offered by WannaHavaCookie were nearly as delicious to eat as they were pretty to look at.


\

Sunday, November 8, 2009

Braised Chicken Thighs with Mushrooms and Bacon


By now, it should be no secret that braising is my favorite cooking method. Aside from the obvious attractiveness of braising (makes delicious leftovers, uses inexpensive cuts of meat, etc.), I love braising because I am comfortable and confident enough with it that I do not need to use a recipe to come up with a flavorful dish. As long as you follow the basic formula of browning the meat, sauteing the aromatics, deglazing the pan, adding the braising liquid, and cooking until the meat is tender, you are virtually guaranteed a nice meal.

All I did with for the below recipe was to follow the aforementioned technique using the ingredients that I had on hand. Braising really is that easy. These braised chicken thighs have a wonderfully rich and earthy sauce thanks to the mushrooms and bacon. Serve them over polenta to soak up the liquid.

Braised Chicken Thighs with Mushrooms and Bacon
Serves 4

Ingredients:
  • 8 bone-in chicken thighs
  • Salt and pepper
  • 3 slices bacon, chopped
  • 1 medium yellow onion, finely chopped
  • 10 oz. button mushrooms, thinly sliced
  • 3 garlic cloves, minced
  • 1/2 cup dry white wine or vermouth
  • 1/2 cup chicken stock
  • 1/4 cup chopped parsley
Directions:
  1. Season the chicken thighs with salt and pepper. Set aside.
  2. In a deep skillet over medium heat, saute the bacon until beginning to brown, about 5 minutes. Remove the bacon with a slotted spoon and drain on a paper towel-lined plate.
  3. Add the chicken thighs to the skillet, careful not to crowd them. If necessary, cook in two batches. Cook the chicken thighs until well browned, 3 to 5 minutes per side. Set chicken aside on a plate.
  4. Pour off all but 2 tablespoons of fat from the pan. Add onions, garlic, and mushrooms to skillet. Cook, stirring occasionally, until the mushrooms begin to brown and have released their moisture, about 10 minutes.
  5. Pour the wine into the skillet and bring to a boil. Stirring up any brown bits that have stuck to the bottom of a pan with a wooden spoon, reduce the wine by half, about 4 minutes.
  6. Add the stock to the pan and bring to a boil. Reduce to a simmer and add the chicken thighs. Cover and cook until the chicken is cooked through, approximately twenty minutes, turning once. Remove the chicken to a warmed plate.
  7. If the sauce needs to be thickened, bring it to a boil and cook until it reaches a desired consistency. Stir in the parsley and season it with salt and pepper. Serve the chicken thighs with the braising liquid.

Tuesday, November 3, 2009

Pork Ribs Braised in Vietnamese Caramel Sauce


The most important ingredient of this rich pork braise is the bittersweet Vietnamese caramel sauce, which gives the braising liquid its dark hue and robust flavor. The key to a perfect caramel sauce is to brown the sugar just shy of the point at which it becomes a black, burnt mess and ruins your pan. As frightening as that may sound, I highly recommend following Andrea Nguyen's recipe and technique for making caramel sauce, which can be found here, along with some extremely helpful photos.

Once you have made the caramel sauce, rest of the recipe will be easy, albeit somewhat time consuming with the marinading and braising time. Although the it calls calls for country cut pork ribs, I would think it would work equally well with other fatty cuts of pork, dark meat chicken, or beef; just adjust the braising time accordingly.

Pork Ribs Braised in Caramel Sauce
Adapted from Andrea Nguyen's Into the Vietnamese Kitchen

Ingredients:

  • 3 lbs country cut pork riblets (ask your butcher to cut the whole ribs crosswise through the bone into long strips)
  • 1 small yellow onion, finely chopped
  • 1 tbsp sugar
  • 1 tsp ground black pepper
  • 6 tbsp fish sauce
  • 6 tbsp caramel sauce (recipe here)
  • 1 cup water, plus more if needed
Directions:

  1. Trim the ribs of any excess fat.
  2. In a large bowl, mix the onion, sugar, pepper, and 3 tablespoons of the fish sauce. Add the riblets and stir well to coat with the marinade. Refrigerate overnight.
  3. Preheat the broiler. Remove the riblets from the marinade (reserve the marinade) and broil until browned on each side, about 9 minutes per side. Set aside on a plate.
  4. Place the riblets in a braising dish or a large skillet with deep sides. Add any juices that have collected on the plate, along with the reserved marinade, caramel sauce, and remaining fish sauce. Pour in enough water to cover the riblets by two-thirds.
  5. Bring the braising liquid to a boil, then reduce to a gentle simmer and cover. Cook for 45 minutes. Uncover the braising dish and turn the ribs. Increase the heat to a vigorous simmer and continue to cook uncovered for 20 minutes or until the pork is very tender. Serve with steamed rice.

Monday, November 2, 2009

Three-Cheese Lasagna

After returning from a week-long trip, the last thing I feel like doing is cooking dinner. Fortunately, after returning from my recent trip to Florida, all I had to do was heat a square of delicious three-cheese and sausage lasagna that I had made using this recipe from Epicurious. It's everything that a lasagna should be: meaty, cheesy, and saucy (make sure to double the sauce recipe). Best of all, it saved me from takeout.

Friday, October 30, 2009

Some Chocolate Porn for Halloween Eve

Halloween may be one day away, but indulge your eyes with some chocolate porn from the Death by Chocolate Torte I recently made for the Significant Eater's birthday. One layer of dense chocolate cake, filled with buttercream frosting, and covered with a chocolate glaze equals pure decadence:


Thursday, October 29, 2009

Romesco Sauce


Romesco sauce is a tomato- and nut-based Spanish condiment. Its smoky flavors go equally well with meat, seafood, and vegetables. While romesco traditionally contains hazelnuts in addition to almonds, I substituted pine nuts, which I prefer, for the hazelnuts. I served the romesco over broiled snapper fillets.


Romesco Sauce

Ingredients:
  • 3 ripe tomatoes
  • 1/2 cup almonds
  • 1/2 cup pine nuts
  • 2 slices country bread
  • 10 cloves garlic, peeled
  • 3/4 cup olive oil
  • 1/2 cup sherry vinegar
  • 1 piquillo pepper, or 1 roasted red pepper
  • 1 tsp smoked paprika
  • salt, to taste
Directions:
  1. Preheat the oven to 450F.
  2. Cut the tomatoes in half. Place, the tomato halves, garlic, nuts, and bread on a baking sheet and roast until the nuts begin to brown, about 10 minutes.
  3. Place the tomatoes, garlic, nuts, and bread in the bowl of a food processor and pulse until they are well blended and there are no large chunks.
  4. Add the olive oil, vinegar, roasted pepper, and paprika to the food processor and pulse until well blended. Pour the romesco into a large bowl and taste for salt.
  5. Refrigerate the romesco for at least 8 hours or overnight to let the flavors meld. Serve it at room temperature.

Wednesday, October 28, 2009

Roasted Monkfish with Potatoes, Olives, and Bay Leaves

Roasted monkfish is delicious for fall. This simple recipe from Mark Bittman for roasted monkfish with potatoes, olives, and bay leaves makes a wonderful one pot meal. Below, I have deviated slightly from Bittman's instructions to create an equally tasty dish.

First, over medium heat, saute some generously salted potatoes in enough olive oil to cover the potatoes, flipping them every so often so that they soften but do not burn:


Next, add a handful of olives, the seasoned monkfish, and handful of bay leaves to the pan. Some chopped thyme would also be a nice addition. Put the pan in a 400F oven and roast until the fish is cooked through, about ten minutes:


Finally, slice the fish into equal servings and serve it with the potatoes. I accompanied the fish and potatoes with Swiss chard that I sauteed with bacon: