Friday, December 31, 2010

So Long, 2010!


Looking back on 2010, I have to say that it’s been a pretty darn good year for me in terms of food.  I bookended the year with trips to the foodie paradise of San Francisco, first for New Year’s, then for the Foodbuzz Blogger Festival in November, and maintained a frenetic pace of cooking and eating in between.   Sure, I didn’t meet all the goals I had set for myself this year—that jar of squid ink still lingers in my fridge, now contending for space with a pesky jar of shrimp paste—but I am pretty darn satisfied with 2010 overall.  If there’s anyone who deserves my credit for making this such a good year for me food-wise, it is the people at Foobuzz, who provided two of the biggest highlights of my year in Foodbuzz Fest and Project Food Blog.  Both events exposed me to some incredibly talented and kind bloggers and showed me just how much fun I can have with this blog.  Oh yeah, and Project Food Blog got me to make a pretty mean batch of curry

So what’s in store for 2011, the third year (gasp!) of this blog’s existence?  Well, I’m going to push myself to make some big-time improvements.  You should see more frequent posts, more original recipes, and better photography on this blog.  All in all, I’m going to aim for every post on this blog to be Project Food Blog-worthy.  It will mean I have to spend a little more time in my kitchen and working on this blog, but it is a fun challenge that I can’t wait to begin. 

And with that, I am tipping my hat to 2010 and plunging into 2011! I wish you all a happy New Year!

Saturday, December 25, 2010

Merry Christmas!


Bugs and I wish you all a very Merry Christmas!

Thursday, December 23, 2010

Manicotti filled with a Little Something Something


One of my favorite meals growing up was my mother's manicotti.  I always assumed it just like all the other mom foods we love.  Crepes filled with ricotta cheese and topped with a little tomato sauce.  Easy, right?

I thought wrong.  After making these lamb-filled crepes this weekend, I now realize that I should have given my mom more credit for her manicotti.  Everything on down to the crepes was easy to prepare, but those pancakes sure were a doozy!  The technique sounded easy enough to me: a little butter in a non-stick pan, swirl the batter around, cook, flip, and cook a bit more.  But after several ugly, broken crepes and more batter over the Significant Eater's stovetop than she wants to know, I realized that I had to make some changes to my crepe technique.  I finally figured that the key to a good crepe is to keep it thin, stupid.  By putting just enough batter to cover the pan, the crepe will nearly cook through so that when you flip it, it will stay in tact.  Once I figure that out, I was a crepe-making machine, turning out a flawless crepe every few minutes.

Aside from the crepe part, this dish is the simple kind of component cooking I love.  It sounds intricate— braised meat, crepes, tomato sauce#151;but every component can be made well ahead of time.  Even better, you can turn this dish into anything you please by using the flavor profile of your choosing.  While I used braised lamb and flavored the ricotta with mint,  you could try braised pork shoulder and sage-flavored ricotta, or short ribs with rosemary ricotta.  Even crab and parsley ricotta with a pink sauce.  To that end, in order to keep you all on your creative tiptoes, I've made this recipe as ambiguous as possible. 


Manicotti filled with the Cook's Choice

Ingredients:

For the crepes:
  1. 2 cups whole milk
  2. 1 1/2 cups plus 2 tbsp flour
  3. 4 eggs, lightly beaten
  4. 4 tbsp butter, melted
  5. 1/2 tsp salt

For the ricotta filling:
  • 2 lbs braised meat of your choice, shredded with a fork
  • 1/4 cup herbs of your choice
  • 1/4 tsp red pepper flakes
  • 3 cloves garlic, minced
  • 2 cups good-quality fresh ricotta cheese
  • Tomato sauce of your choice, preferably homemade
  • Pecorino Romano cheese, grated
Directions:
  1. Mix the crepe ingredients together in a large bowl.  Strain and refrigerate overnight.
  2. Mix together the ingredients for the crepe filling.
  3. Heat the tomato sauce.
  4. Preheat the oven to 375F.
  5. To make the crepes, heat a medium-size nonstick pan over medium heat and brush it with melted butter.  Ladle a quarter cup of the crepe batter into the pan and swirl the batter around so that the bottom of the pan is entirely coated (you want the crepe to be very thin).  Let the crepe cook for 1 to 2 minute until it is nearly cooked through.  Carefully flip the crepe and cook the other side for another minute.  Remove the crepe to a plate.  Repeat this technique with the rest of the batter, stacking the crepes on a plate.  This should make approximately 15 to 20 crepes.
  6. To make the manicotti, fill the center of each crepe with about 1/3 cup of the ricotta filling.  Wrap each crepe and place seam-side down in a greased casserole dish.  
  7. Place the casserole dish in the oven and cook until the sides of the manicotti begin to brown, 7 to 10 minutes.
  8. Top the manicotti with the heated tomato sauce and grated Pecorino Romano cheese and serve immediately.


Tuesday, December 14, 2010

Ground Pork with Shrimp Paste and Lemongrass


I'll be the first to admit that shrimp paste isn't for the squeamish.  Pungent—and not in a good way—and pasty, for lack of a better word, the ingredient made of ground fermented shrimp might scare away even the most adventurous foodies.  However, as any lover of Southeast Asian cuisine is aware, shrimp paste makes pretty much everything taste better.  Just take Thai curry or papaya salad: yup, you guessed it, shrimp paste is an active player in their deliciousness.  As much as I try, I can't quite live off of curry and papaya salad, so I'm always looking for new ways to use up some of the jar of shrimp paste in my fridge. This pork recipe, loosely adapted from Andrea Nguyen's Into the Vietnamese Kitchen, was one of those attempts.  Typical of most Southeast Asian dishes, this one plays off of a contrast of flavors, with sweet, salty, and spicy well represented.  I still have half a jar of shrimp paste left, but I suspect I'll be purchasing more in no time.


Ground Pork with Shrimp Paste and Lemongrass
Serves 4

Ingredients:
3 tbsp peanut oil
3 dried Thai chiles
4 cloves garlic, minced
3 lemongrass stalks, trimmed, cut in thirds, and pounded with the flat side of a knife
1/2 pound ground pork
12 shrimp, peeled, deveined, and minced
1 tbsp sugar
2 tbsp shrimp paste, diluted in 1/4 cup warm water
1 tsp sesame seeds
2 Kirby cucumbers, thinly sliced

Directions:
Heat the oil in a large skillet over medium-high heat.
Add the chiles to the skillet and cook, stirring occasionally until they are fragrant and blackened.
Add the garlic and lemongrass to the skillet and cook until the garlic is fragrant, about 1 minute.
Add the pork to the skillet.  Use the back of a wooden spoon to break the pork up as it cooks, and cook until the meat is no longer pink, about 3 minutes.
Stir in the shrimp, sugar, and shrimp paste and cook for about ten minutes, stirring occasionally, until the mixture caramelizes, turning a reddish brown.  If the pan dries out, add a tablespoon of water at a time.
Remove the mixture from the pan and serve immediately with rice, topped with sesame seeds and garnished with the cucumbers.

Sunday, December 12, 2010

FIJI Water Holiday Cookie Swap and Bake Off to Benefit the Lower Eastside Girls Club


 This Saturday, December 18, I will be baking a batch of cookies for the FIJI Water Holiday Cookie Swap and Bake Off, a cookie sale to benefit the Lower Eastside Girls Club.  If you live in New York City, I urge you to attend and support a great cause while filling up on a plethora of cookies.  The event will be held from 1pm to 4pm at Vie Vie (East 1st St. between First and Second Avenues).  Tickets can be purchased here for $15.  As for what I will be baking: I am still deciding, but I did make a test batch of Dorie Greenspan's Chocolate Whopper Cookies this weekend, and I think they will be tough to beat. 

Monday, November 29, 2010

Spaghetti Squash with Sage


I intended to post this recipe prior to Thanksgiving, but alas, I got wrapped up preparing the big feast.  While it would be perfect on Turkey Day for the nice presentation, this roasted spaghetti squash, adapted from Andrew Carmellini's Urban Italian, is simple enough to have as a side dish for a weeknight meal.  Carmellini calls for walnuts, but they didn't do too much for me; to add a little crunch I would try mixing in some toasted squash or pumpkin seeds.  Carmellini also suggests adding grated Parmesan cheese to the squash, so if you have cheese on hand, feel free to use it.

Roasted Spagghetti Squash with Sage and Squash Seeds
Adapted from Urban Italian

Ingredients:
  • 1 spaghetti squash
  • salt and pepper
  • 5 tbsp butter, divided in 1 tbsp pieces
  • 15 fresh sage leaved
Directions:
  1. Preheat the oven to 400F.
  2. Slice the squash in half lengthwise.  
  3. Use a spoon to scrape out the seeds and set the seeds aside.  
  4. Season both halves of the squash with salt and pepper.  
  5. Place 1 tbsp butter and 2 sage leaves in the cavity of each squash half and roast on a baking sheet until the squash is completely tender, about one hour.
  6. Use a fork to to scrape out the meat from each squash half.  Reserve the squash skins and put the strands of squash in a bowl.  
  7. Heat the remaining 3 tbsp butter in a medium sauce pan over medium heat.  
  8. Add the squash seeds to the sauce pan and cook, stirring occasionally, until they are golden, 3 to 5 minutes.
  9. Add the remaining sage leaves to the sauce pan and cook until they are fragrant, about 1 minutes.
  10. Stir the squash into the pan and cook for 2 minutes, stirring constantly to mix all of the ingredients together.  Season with salt and pepper to taste.
  11. Remove the squash from the pan and serve it in one of the squash skins.

Sunday, November 28, 2010

Thanksgiving Aftermath


For Thanksgiving, Significant Eater and I hosted R (of Love at First Shop) and M at Significant Eater's apartment.  This marked the first time I have ever cooked an entire Turkey Day feast, and I must admit that I was pretty nervous about it.  However, it all went off without a hitch aside from me forgetting to bring my camera, hence the lack of quality pictures.

Our turkey, a 14-pounder I purchased from Dickson's Farmstand Meats,  was raised on an Amish farm in Pennsylvania and had been slaughtered the day I purchased it.  Like mine, Significant Eater's oven is pretty tiny and fitting a whole turkey in it was going to be difficult, so I decided to breakdown the bird and cook the white meat and dark meat separately.  I covered the breast in butter and herbs and roasted it and braised the thighs and drumsticks in a well-seasoned broth.  In doing so, I was able to guarantee that both the white meat and dark meat were cooked perfectly.  As an added bonus, the braised legs and roasted breast provided us with a diverse heap of leftovers.


Alongside the turkey, I served an andouille dressing made with challah bread, mashed potatoes, cranberry sauce, pan-roasted Brussels sprouts with bacon, and gravy.  For dessert, Significant Eater supplied a deliciously gingery pumpkin pie from Two Little Red Hens bakery and M and R (who has a wonderful post-feast write-up of her own) brought along a wonderful array of sweets.  Like any great dinner party, all of this excess was fueled by plenty of wine, which helped me keep my cool while cooking so many courses with limited counter and stovetop space.  


It was a truly awesome Thanksgiving with awesome company.  Once we get through all the leftovers, which should happen in November 2011, I'll be ready to do it all over again.

Tuesday, November 23, 2010

Sauteed Brussels Sprouts with Bacon, Lemon, and Chili Flakes


You still have time to finish your Thanksgiving menu.  Here's a simple side that sure to please even the Brussels sprout haters.  Between the heat of the chili flakes, the acidity of the lemon, the sweetness of the bacon and Brussels sprouts, and the fresh flavor of the mint, I love the flavor contrasts in this dish.

Sauteed Brussels Sports with Bacon, Lemon, Chili Flakes, and Mint
Serves 2 to 3
 
Ingredients:
  • 3 slices of bacon, diced
  • 12 oz. Brussels sprouts, cut in half if large
  • juice from half a lemon
  • 1/4 tsp dried red chili flakes
  • salt and pepper, to taste
  • 1/4 cup mint leaves, finely chopped

Directions:
  1. Heat a large skillet over medium-high heat.  Add the bacon and cook, stirring occasionally, until it is crisp. about 3 minutes.  Remove the bacon from the pan with a slotted spoon.
  2. Add the Brussels sprouts to the skillet and season with salt and pepper.  Cook the Brussels sprouts, stirring occasionally, until they brown on all sides, 7 to 10 minutes.  
  3. Add the chili flakes to the pan and reduce the heat to medium and continue to cook until the Brussels sprouts soften, another 10 to 15 minutes.
  4. Reduce the heat to low.  Pour in the lemon juice and season the Brussels sprouts with salt and pepper to taste.  
  5. Put the Brussels sprouts in a bowl and top with the reserved bacon and the mint.  Serve immediately.
 

Thursday, November 18, 2010

Cranberry-Apple Crisp with a Semolina Topping


I'm very much a traditionalist when it comes to Thanksgiving desserts.  All other times of the year, I love creative desserts, but at Thanksgiving, all I want is pie, preferably of the pumpkin or pecan variety.  After tasting this cranberry-apple crisp I was surprised to find myself thinking that it would be a perfect way to end a Turkey Day feast.  This crisp has all of the familiar Thanksgiving flavors, but it goes the extra mile with plenty of orange and lemon zest and a hint of anise in the topping.  It is sure to please both the traditionalists and those who want a bit more creativity in their desserts.


The recipe comes from one of my favorite food blogs, Smitten Kitchen. As suggested, I cut out all of the white sugar in the filling, and I substituted Jonagold apples for the more tart Granny Smiths.  I also used semolina flour in lieu of the polenta that Smitten Kitchen calls for.  The crisp turned out perfectly, if I do say so myself. 


Cranberry-Apple Crisp with a Semolina Topping
Adapted from Smitten Kitchen

For the topping:
  • 1 tsp anise seed, toasted in a skillet
  • 1 1/2 cups pastry flour
  • 3/4 cup semolina flour 
  • 1/2 cup sugar
  • 1 1/2 tsp baking powder
  • 1/4 tsp salt
  • 1/2 cup (1 stick) chilled unsalted butter, cut into 1 tbsp cubes
  • 1 egg, beaten
For the filling:
  • 2 cups fresh cranberries
  • 2/3 cup golden brown sugar
  • 2 tsp grated lemon peel
  • 1 1/2 tsp grated orange peel
  • 1 tsp ground cinnamon
  • 1/2 tsp salt
  • 1/4 tsp freshly ground black pepper
  • 2 pounds Jonagold apples, peeled, cored, cut into 1-inch cubes
  • 2 tbsp fresh lemon juice
  • Vanilla ice cream, for serving
Directions:
  1. Preheat the oven to 375F.
  2. Make the topping by combining the first six ingredients in the bowl of a food processor. Pulse a few times to combine. Add the butter and continue to pulse until the mixture forms into coarse crumbs. Remove the topping to a bowl and drizzle the egg over the topping.  Stir well to combine the egg with the rest of the ingredients.
  3. Combine all of the ingredients for the filling in a large bowl.  Stir well so that the apples are coated with all of the spices and lemon juice.  
  4. Pour the filling into a 11 by 7 1/2 inch baking dish.  Crumble the topping over the filling. 
  5. Put the baking dish in the oven and bake until the topping is golden and the filling is bubbling, about an hour.  Let the crisp cool for 15 minutes before serving, the serve in bowls, topped with the vanilla ice cream.

Wednesday, November 17, 2010

The Anatomy of a Braise

With the weather getting cold, there's nothing better than a hearty braised dish.  As long as you've got the time—at least an hour for lighter meats like chicken and several hours for denser meats like beef and lamb—braising is one of the simplest cooking methods out there. Just follow these the steps below and you will be able to braise just about anything.  The best thing about braises is that they are very forgiving as long as you follow the general method that I describe here, so you may tweak the ingredients according to your own personal preference and imagination.


The best braises utilize tough, sinewy cuts of meat, preferably on the bone to bring out the best flavor.  Lamb shanks, pork butt, and short ribs are some of my favorite braising cuts.  In this case, I used two meaty pork shanks.

The first step is to brown the meat.  Heat a small amount of oil (remember, most braising cuts already have a good bit of fat on them) over high heat in a Dutch oven or other braising dish.  Then season the meat well with salt and pepper and toss it in the pan.  You want to cook it until it is well browned on all sides, then set it aside on a plate.


Next up are the aromatics.  Celery, onions, and carrots (the "Holy Trinity" of cooking) are the typical aromatics, but you can use any number of chopped root vegetables.  I like to use fennel in addition to the standards.  Adding some extra fat to the pan if necessary, you want to cook the aromatics over medium heat until they are soft and beginning to brown.


Once the aromatics have cooked, you can add some seasonings.  A bay leaf, thyme, and rosemary are some of my favorite seasonings for a basic braise, but you can use any mix of spices and herbs. Once you add the seasonings, you'll want to deglaze the pan with a big splash of dry white wine or vermouth.  Let the wine come to a boil and be sure to scrape the bottom of the pan with the bag of a wooden spoon so that you dislodge the brown bits of meat that may be stuck to the bottom of the pan, which add lots of flavor to the braise. Let the wine boil away until the pan is almost dry.

Now, you'll want to add the meat back to the pan.  Then add enough stock to come up to about a third of the way up the meat.  It's best to match the stock to the meat you are using (i.e. lamb stock for lamb, beef stock for beef, etc.), but as a general rule of thumb, use heavier stocks for heavier meats and lighter stocks for lighter meats.  I added far too much stock in the photo; you really want it to come only a third of the way up the meat.


Now you're ready to braise. I prefer to braise in the oven, where I can depend on a constant temperature, but you can also braise on the stove top.  The key is to cover the pan tightly and braise at very low heat; you want the liquid to be at a very slow simmer.  Every 45 minutes or so, it's a good idea to flip the meat and re-cover the pot.  You'll want to braise the meat until it is falling off the bone, so check on it every time you flip it.


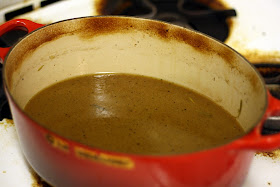
Once the meat is done, you can set it aside on a plate while you finish the sauce.  If you want a more refined sauce, you can strain the braising liquid and remove the aromatics as I have done.  For a more rustic sauce, you can leave the aromatics in the liquid.  The important thing is that you taste the liquid to ensure that it is well-seasoned and of a good consistency.  If it needs to be thicker, boil it for a few minutes and add salt and pepper to taste.


Now you're ready to serve the braise.  Put the meat in a serving dish, pour over some of the braising liquid, and serve the it all alongside a starchy side like mashed potatoes, polenta, or beans that will soak up all of the delicious liquid.


Wasn't that easy?

Sunday, November 14, 2010

FoodBuzz Blogger Festival


 Last weekend, I ventured out to San Francisco for the second annual FoodBuzz Blogger Festival, a three-day celebration of good food, good wine, good beer, and the people who just can't get enough of all three.  This being my first blogger event, I didn't know quite what to expect, but it was an amazing weekend and the great people at Foodbuzz did a wonderful job of pulling it off.  I knew the food blogging community was pretty awesome, but having the chance to meet so many of the 350 bloggers who attended the conference was inspiring.  Attendees came from as far away as Bulgaria (Casey of Eating Gardening & Living in Bulgaria), had non-food-related interests as cool as playing in a rockabilly band (Sabrina of The Tomato Tart), and had blog topics that ran the gamut, from nutrition (Mellissa of A Fit and Spicy Life) to baking (Lindsey of Gingerbread Bagels) and everything in between.  Whether we wrote about healthy living or pure gluttony like me, we all came out to San Francisco share our love for food.


Foodbuzz did not skimp on the food at the festival.  After three days of stuffing myself in San Francisco, I found myself paying a little more attention to the nutrition blogs whose authors I met at the festival.  The first night of the festival was the Street Food Fair, which brought San Francisco's best food trucks to Fort Mason.  Among my favorite eats at this were the fried pork loin sandwich with chicharrones (pictured below) from 4505 Meats, the porchetta sandwich from RoliRoti, and the escargot lollipop from Spencer on the Go.


The following morning, I attended a couple of the blogger workshops held at the Sir Francis Drake hotel in Union Square.  While very short, both the sessions on photography and video blogging were informative and entertaining and were led by some very talented bloggers, with Marc of No Recipes and Laura of The Cooking Photographer leading the photography workshop and Pim of Chez Pim, John from Food Wishes, and Sabrina of RhodeyGirlTests leading the video session.


That afternoon, we all attended Taste Pavillion, a four-hour event at Metreon featuring an impressive spread of food and drinks from the festival's sponsors and local breweries, wineries, and artisan food makers.  With my hands (and stomach) full of beer, wine, and plates of food, my pictures from the Taste Pavillion were a little sloppy to say the least.

The final night of the festival was held at the Ferry Building and involved a cocktail hour followed by an excellent four-course dinner with wines to match each course from Bonny Doon Vineyard.  The dinner was very well-prepared, and I particularly enjoyed the seared scallops and perfectly cooked rack of lamb. 


Unfortunately, a hard downpour on Sunday convinced me to skip out a brunch on the final day of the festival, but that didn't stop me from being so happy that I decided to make the trip out to San Francisco.  With all the amazing people I met and great foods I ate, I will definitely try my best to return next year.

Wednesday, November 10, 2010

How Momofuku Stole My Million Dollar Idea with a Sausage


I recently came up with my million dollar New York City food cart idea. The plan was to make pork burgers in the style of laab, chock full of lemongrass and toasted rice powder. I knew it would be a surefire hit. I'd set up shop in midtown during the day, filling the stomachs of office workers for $7 dollars a pop for a laab burger and all the accompaniments.  At night, I would trek down to the East Village to let sloshed NYU students sober up over some laab burgers served in a more low-brow style with a sesame bun and can of Four Loko. Alas, this great idea came to an end as I was perusing the Momofuku cookbook.  It was there—page 176, to be exact—that I spotted Tien Ho's recipe for Lemongrass Pork Sausage. It sounded similar enough to my idea, but I knew that the toasted rice powder, my secret ingredient, would set my dish apart.  Then I read the blurb above the recipe, which stated that toasted rice powder would be a nice addition to the sausage.  That's right, Tien Ho and David Change had my idea before I'd even thought of it. Back to the drawing board it is.  As for the Momofuku Lemongrass Pork Sausage? Well, I think theirs is better than mine would have been anyway.

Sunday, November 7, 2010

Spaghetti with Anchovies and Caramelized Onions

On my recent shopping trip to Eataly, I picked up a can of salt-packed anchovies. Whole salt-packed anchovies are to oil-packed anchovy fillets what jarred oil-packed Italian tuna is to domestic water-packed canned tuna. Sure, they cost more and take a bit more effort to cook with, but the taste of salt-packed anchovies is levels above their oil-packed brethren.


This simple pasta should appeal even to the anchovy-haters, of which we all know there are many. While the anchovy flavor is apparent, the dish is not fishy.  Combined with the caramelized onions, olive oil, and toasted breadcrumbs, the anchovies make a light sauce that is much more than the sum of its parts.

It does take some time to fillet the anchovies, but the rest of this dish can be put together in under 30 minutes.  Unfortunately, as I had few anchovy-loving friends and did not want to rub my smelly anchovy fingers on my camera, I do not have any photos of filleting the fish, but it's quite easy.  First, rinse the salt off of each anchovy.  Then soak them in water for about 20 minutes, changing the water few times as they soak. Rinse them off and run the blunt side of a paring knife along each side of the fish to scrape off any scales.  Then, pluck off all of the fins.  Use the paring knife to butterfly each fish.  Pull each fish gently at the tale and pull out the backbone in one clean sweep.  Finally, cut each side of the fish into 3 even fillets.  Then you can relax as you throw together the rest of the dish.


Spaghetti with Anchovies and Caramelized Onions
Serves 4

Ingredients:
  • 1 lb. spaghetti
  • 1/4 tbsp olive oil
  • 2 yellow onions, thinly sliced
  • 3 cloves garlic, thinly sliced
  • 1 tbsp crushed red pepper flakes
  • 6 salt-packed anchovies, filleted
  • 1/4 cup parsley
  • 1/2 cup toasted breadcrumbs
Directions:
  1. Bring a large pot of salted water to a boil.   
  2. Heat 3 tbsp olive oil in a large skillet over medium heat.  Add the onions and cook, stirring occasionally, until they are very soft and golden brown in color, about 20 minutes.
  3. Add the remaining olive oil to the skillet and increase the heat to medium-high.  Add the garlic and red pepper flakes to the pan and cook until the garlic becomes very fragrant, about 1 minute.  
  4. Add the anchovies to the skillet.  Cook, stirring constantly, until the anchovies have completely broken down into the sauce, 3 to 5 minutes.  Reduce the heat to low.
  5. Cook the spaghetti in the boiling water until al dente.
  6. Stir the pasta and the parsley into the sauce.
  7. Serve the pasta in bowls, topped with a few spoonfuls of the toasted breadcrumbs.

Thursday, November 4, 2010

Off to San Francisco for Foodbuzz's Blogger Festival!

That's right! Tomorrow, I will be heading to San Francisco for Foodbuzz's second annual Blogger Festival. I can't wait for a fun-filled weekend of meeting my fellow bloggers and celebrating the wonderful world of food.  And I definitely can't complain about getting away from this cold, wet weather in NY to be in 70-degree San Francisco. I hope to meet some of you there!

Tuesday, November 2, 2010

First Impressions of Eataly

During my recent staycation and blogging hiatus, I had the opportunity to visit Eataly, Mario Batali and Lidia and Joe Bastianich's recently opened Italian mega-grocery store near Madison Square Park.  If you can get yourself through the omnipresent crowds, the store—an attempt to clone the original Eataly in Turin— is quite impressive.  Offering a vast array of the best imported dry goods from the Italian motherland, fresh produce and top-quality meats from some of the best domestic producers, Eataly is definitely a welcome addition to the city's ever-expanding list of gourmet markets. 

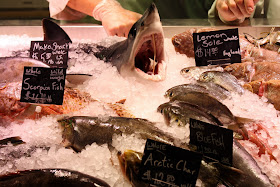
Once you get past the entrance of Eataly, where customers are packed to the brim standing in line at the gelato, espresso, and panini counters, one of the first things you will see is the impressive fish stand.  I cannot think of many other places in New York with such a wide selection of seafood.  For some reason, I thought that the mako shark might have been screaming my name.


My favorite section of the gourmet grocery was the pasta section, where you can purchase just about any shape of dry pasta imaginable from a variety of authentic Italian producers, from small artisanal pasta makers to everyday Barilla.  The prices are reasonable, too. 


Eataly's meat case is impressive. While pricey, it's packed with gorgeous cuts of beef, pork, lamb, and veal.  You can even find a nice selection of offal and fresh rabbit, which can be hard to track down in New York. One of these days, I will pick up some of the luxurious Piedmontese beef.


And, I just have to add, I picked up a can of salt-packed anchovies from the dry goods section... but, you'll just have to wait and see what I whip up in a later post.


I will have to return Eataly to try the breads baked in the wood-burning oven, but they certainly looked delicious.


As you twist through the aisles and the crowds, there are plenty of treats to be found from cheeses (burrata!) to these sausages from Cesare Casella's Salumeria Rosi.


In addition to the already-open Manzo, described as a "Piedmontese steakhouse," Eataly will also have a rooftop brewery and beer garden, which is to open in February.  In the meantime, you can find a great selection of Italian microbrews in the store as well as plenty of brews from Delaware's Dogfish Head Brewery, which is collaborating on the rooftop brewery.  Molto Mario must have put the Molto Malto beer on the shelf himself.


If only I lived near Madison Square Park, I would undoubtedly stop at Eataly often on my way home from work to pick up some prepared foods and fresh pastas for dinners.  On second thought, my wallet is glad that I live nowhere near the store.


Eataly received lots of press for its "vegetable butcher" gimmick, where an employee will clean and chop your vegetables free of charge, but the vegetables for sale are plenty beautiful on their own.  You're much better off taking these home and preparing them yourself.


I'm a sucker for cured meats and cheeses, but the crowds hoarding the counters at these stations were insane.  I will get to them one of these days...


Eataly is definitely worth a visit.  While the prices are high, they are not any worse—and in some cases they are better—than other gourmet markets in New York.  Best of all, the quality of the foods is apparent. While the crowds can make navigating through the store a bit of a hassle, most of the people wandering the aisles are just oglers; I was able to pick up the anchovies, some pasta, and a few cuts of meat and checkout in under twenty minutes.

So, what Italian treat did I make after I returned home from Eataly? Stay tuned...

Wednesday, September 29, 2010

24 Hours Left to Vote for me in #PFB2010!

Just a reminder that there are just under 24 hours left before voting for Challenge #2 of Foodbuzz's Project Food Blog ends at 9PM EST on September 30! So if you have yet to vote for me in this challenge, please run over and read my post on cooking Red Curry Chicken and vote! After reading everyone's posts, I can tell that this round will be a tough one, so I'll need all the help I can get.  Thanks in advance to everyone who votes!