Showing posts with label braise. Show all posts

Wednesday, November 17, 2010

The Anatomy of a Braise

With the weather getting cold, there's nothing better than a hearty braised dish.  As long as you've got the time—at least an hour for lighter meats like chicken and several hours for denser meats like beef and lamb—braising is one of the simplest cooking methods out there. Just follow these the steps below and you will be able to braise just about anything.  The best thing about braises is that they are very forgiving as long as you follow the general method that I describe here, so you may tweak the ingredients according to your own personal preference and imagination.


The best braises utilize tough, sinewy cuts of meat, preferably on the bone to bring out the best flavor.  Lamb shanks, pork butt, and short ribs are some of my favorite braising cuts.  In this case, I used two meaty pork shanks.

The first step is to brown the meat.  Heat a small amount of oil (remember, most braising cuts already have a good bit of fat on them) over high heat in a Dutch oven or other braising dish.  Then season the meat well with salt and pepper and toss it in the pan.  You want to cook it until it is well browned on all sides, then set it aside on a plate.


Next up are the aromatics.  Celery, onions, and carrots (the "Holy Trinity" of cooking) are the typical aromatics, but you can use any number of chopped root vegetables.  I like to use fennel in addition to the standards.  Adding some extra fat to the pan if necessary, you want to cook the aromatics over medium heat until they are soft and beginning to brown.


Once the aromatics have cooked, you can add some seasonings.  A bay leaf, thyme, and rosemary are some of my favorite seasonings for a basic braise, but you can use any mix of spices and herbs. Once you add the seasonings, you'll want to deglaze the pan with a big splash of dry white wine or vermouth.  Let the wine come to a boil and be sure to scrape the bottom of the pan with the bag of a wooden spoon so that you dislodge the brown bits of meat that may be stuck to the bottom of the pan, which add lots of flavor to the braise. Let the wine boil away until the pan is almost dry.

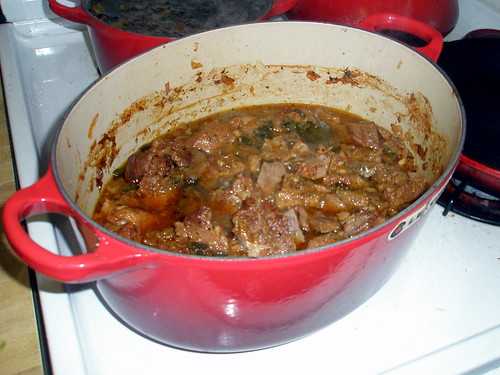
Now, you'll want to add the meat back to the pan.  Then add enough stock to come up to about a third of the way up the meat.  It's best to match the stock to the meat you are using (i.e. lamb stock for lamb, beef stock for beef, etc.), but as a general rule of thumb, use heavier stocks for heavier meats and lighter stocks for lighter meats.  I added far too much stock in the photo; you really want it to come only a third of the way up the meat.


Now you're ready to braise. I prefer to braise in the oven, where I can depend on a constant temperature, but you can also braise on the stove top.  The key is to cover the pan tightly and braise at very low heat; you want the liquid to be at a very slow simmer.  Every 45 minutes or so, it's a good idea to flip the meat and re-cover the pot.  You'll want to braise the meat until it is falling off the bone, so check on it every time you flip it.


Once the meat is done, you can set it aside on a plate while you finish the sauce.  If you want a more refined sauce, you can strain the braising liquid and remove the aromatics as I have done.  For a more rustic sauce, you can leave the aromatics in the liquid.  The important thing is that you taste the liquid to ensure that it is well-seasoned and of a good consistency.  If it needs to be thicker, boil it for a few minutes and add salt and pepper to taste.


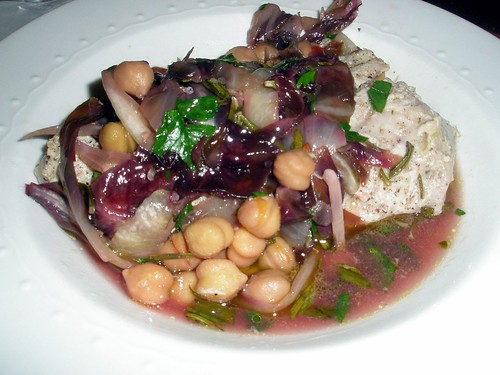
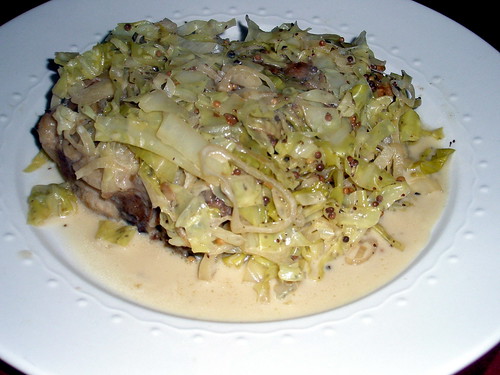
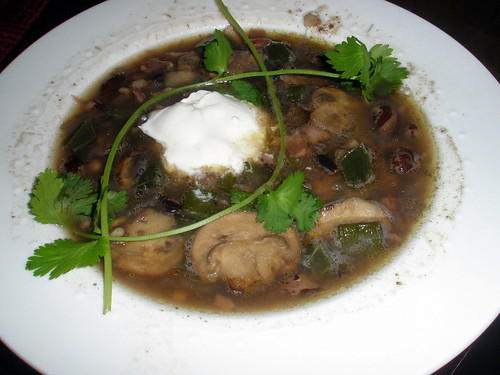
Now you're ready to serve the braise.  Put the meat in a serving dish, pour over some of the braising liquid, and serve the it all alongside a starchy side like mashed potatoes, polenta, or beans that will soak up all of the delicious liquid.


Wasn't that easy?

Monday, August 23, 2010

Pork Cheek Ravioli with Brown Butter Sage Sauce


 The inspiration for this dish began at Dickson's Farmstand Meats, which has become my butcher of choice in New York, not only for its dedication to selling humanely raised meats from local farmers, but also for the more esoteric cuts of meat that it sells.  It was at Dickson's that I spotted a sign for pork cheeks, and, as is the case with most meats that I am utterly clueless about cooking, I could not resist purchasing a pound of them.


The one thing that I did know about pork cheeks was that they are a tough cut best suited to braising.  However, it being mid-August, a heavy braised dish was not exactly tempting.  I thought about making a pork cheek ragu, but that seemed too much within my comfort zone; I needed to do the pork cheeks some justice.  Staying on the pasta path, I decided that a ravioli stuffed with braised pork cheek would be the perfect way to serve pork cheeks in the summer.  The one problem was that I do not own a pasta maker.  However, I remembered hearing that it was possible to make ravioli using wanton wrappers, and that is exactly what I did.


The results could not have been better.  The braised pork cheeks required three hours of braising time before they were meltingly tender.  Surprisingly, the delicate wanton wrappers were a pretty close substitute for freshly made pasta.  To ensure that the pork cheeks kept the lead role in the dish, I topped the pasta with a simple brown butter sage sauce, which I brightened with lemon juice to pare down the richness of the pork.  On my way home from the butcher, I had been worried about how I would manage to ruin the pork cheeks, but I can't imagine having them any better way. 


Pork Cheek Ravioli with Brown Butter Sage Sauce
Serves 4 

For the pork:
  • 1 lb. boneless pork cheeks
  • salt and pepper
  • 2 tbsp olive oil
  • 2 cloves garlic, minced
  • 1 carrot, finely diced
  • 1 medium yellow onion, finely diced
  • 1/2 cup dry red wine
  • 1/2 cup canned diced tomatoes with their juice
  • 1 cup chicken stock
  • 1 bay leaf
  • 1 tsp fresh thyme leaves
  • 1/2 tsp dried red pepper flakes
For the pasta:
  • 20 wanton wrappers
  • 4 tbsp unsalted butter
  • 10 sage leaves
  • juice from 1/2 lemon
  • salt and pepper
  • grated Pecorino Romano cheese, for serving
Directions:

For the pork (can be made one day ahead):
  1. Preheat the oven to 275F.
  2. Pat the pork cheeks dry with paper towls.  Season with salt and pepper.
  3. Heat the olive oil in a medium braising dish over medium-high heat.  Add the pork cheeks without crowding (cook in batches if necessary), and saute until well-browned on both sides, about 2 minutes per side.  Set the pork cheeks aside on a plate.
  4. Reduce the heat to medium and add the garlic, carrot, and onion.  Cook, stirring occasionally, until the vegetables soften and begin to brown, 5 to 10 minutes.
  5. Add the wine and bring it to a boil.  Reduce the wine by half, about 3 minutes.
  6. Pour in the tomatoes, stock, bay leaf, thyme, and pepper flakes.  Bring the liquid to a boil, then reduce the heat to a simmer.  Add the pork cheeks and any juices that have accumulated on the plate.  Season the dish with salt and pepper. 
  7. Cover the braising dish and place it in the oven.  Cook, flipping the pork the until the the pork cheeks can be easily shredded with a fork, approximately 3 hours.
  8. Remove the pork cheeks from the braising dish and set them aside on a plate.  If necessary, reduce the braising liquid so that it has almost a syrup-like consistency.  Season with salt and pepper. 
  9. Shred the pork cheeks with a fork and return to the braising liquid. Gently warm the dish prior to filling the ravioli.
For the pasta:
  1. Bring a large pot of salted water to a boil.  Reduce the heat to a steady simmer (any more than a simmer will break the ravioli).
  2. Lay each of the wanton wrappers on a large flat surface.  Using a brush or your finger, wet the edges of half of the wrappers.  
  3. Place approximately 1 tbsp of the braised pork, with a bit of the braising liquid, on the ravioli with wet edges. 
  4. Place the remaining wanton wrappers over the pork, forming the ravioli.  Press down on the edges of each ravioli with your fingers to ensure that the edges stick together.  
  5. Use a fork to press down on the edges of each ravioli to form ridges.
  6. Place the ravioli in the pot of simmering water one at a time to ensure that they do not stick.  Cook until the ravioli float to the top of the water, approximately two minutes.  Carefully remove each ravioli from the pasta water with a slotted spoon.  Place 5 ravioli on each plate.
  7. As the ravioli cook, make the sauce by heating the butter over medium heat.  Once the butter has melted and begins to brown, remove it from the heat.  Stir in the sage leaves and lemon juice and taste for salt and pepper.  
  8. Pour a few spoonfuls of the brown butter sage sauce over the ravioli.  Top each plate with a small amount of grated Pecorino Romano.  Serve immediately. 

Tuesday, April 13, 2010

Braised Turkey Thighs with Cider, Bacon and Potatoes


When I shop for food, I like to create challenges for myself by purchasing meats and vegetables that I have never cooked before.  That is exactly how I ended up with four monstrous turkey thighs in my shopping basket this past weekend.  While buying the least expensive protein out there did not take too much thought, I had little idea of how to prepare them.  Browsing my cookbook collection, I settled on braising the thighs,  which I hoped would ensure that they stayed moist; after all, there is nothing worse than dried-out turkey.  This typical Thanksgiving bird seems to do well with a sweet component--think cranberry sauce-- so I decided to add some hard apple cider to the braising liquid.  As for the bacon and potatoes, well those two ingredients just make everything taste better.


Braised Turkey Thighs with Cider, Bacon and Potatoes
Serves 4 to 6


Ingredients:
  • 4 slices of thick-cut bacon, cut into 1/2-inch pieces
  • 4 turkey thighs
  • salt and pepper
  • 1 carrot, finely chopped
  • 1 celery stalk, finely chopped
  • 1 yellow onion, finely chopped
  • 3 thyme sprigs
  • 1/2 cup hard apple cider
  • 1 cup chicken broth
  • 1 lb. small Yukon gold potatoes, peeled and chopped into quarters
Directions:
  1. Preheat the oven to 300F.
  2. Wash and thoroughly dry the turkey thighs.  Season them on all sides with salt and pepper and set the thighs aside. 
  3. Add the bacon to a large Dutch oven and heat over medium heat.  Cook the bacon, stirring occasionally, until it begins to crisp, 3 to 5 minutes.  Remove the bacon with a slotted spoon and set it aside.  
  4. Increase the heat to medium-high.  Add the turkey thighs to the Dutch oven skin-side down. Do not crowd the turkey thighs; if necessary cook them in two batches.  Cook the turkey until it is well-browned on both sides, about 5 minutes per side.  Remove the turkey legs to a plate and discard all but 1 tbsp of oil from the Dutch oven.
  5. Add the carrot, celery, and onion to the dutch oven.  Cook the vegetables, stirring occasionally, until they begin to brown, about 5 minutes.
  6. Add the thyme and cider to the pan.  Bring the cider to a boil and stir well to break up any brown bits at the bottom of the pan.  Boil the cider until it is reduced by half, about 2 minutes.
  7. Stir in the chicken stock.  Bring the stock to a boil, then reduce the heat to a slow simmer.  Add the potatoes.  Sprinkle the reserved bacon over the potatoes.  
  8. Add the turkey thighs to the Dutch oven, skin-side down.  Cover the pan and place it in the oven.  Cook for 30 minutes, then flip the turkey thighs.  Replace the cover and continue cooking until the turkey is tender, another 30 to 40 minutes. 
  9. Place each turkey thigh in a bowl along with some potatoes.  Spoon off as much fat from the top of the liquid as you can.  Taste the braising liquid for salt and pepper and pour some of it over each serving of turkey and potatoes. 

Tuesday, March 9, 2010

Coq au Vin


 Coq au vin is one of those classic dishes that I have wanted to add to my cooking repertoire for some time but have avoided out of fear that it would be a pain in the you know what to make.  I think I read about someone painstakingly peeling tiny pearl onions for coq au vin and it nearly put me off the dish for good; my fingers are not nearly nimble enough to easily peel pearl onions, nor do I have the patience to do so.  Fortunately, I recently discovered that supermarkets carry peeled, frozen pearl onions  for lazy and clumsy cooks like myself.  I decided to finally give coq au vin a try, and it really wasn't any more difficult than any other braises.  Feeling a bit lame for my use of frozen pearl onions, I've even decided to use fresh onions the next time I make the dish; and the next time will be soon because coq au vin is about the tastiest thing you can possibly do with plain old chicken.  Like most things when it comes to cooking, coq au vin taught me that there are few things that are beyond the home cook's reach (except maybe pheasant, but that's a whole 'nother story).  The below recipe is a mish mash of coq au vin recipes from Cook's Illustrated and Molly Stevens' All About Braising

Coq au Vin

Ingredients:
  • 1 whole chicken, wings, legs, thighs, and breasts separated, giblets wing tips and back bone reserved 
  • salt and pepper
  • 1/4 lb bacon, chopped into 1/2 inch pieces
  • flour for dredging
  • 5 1/2 tbsp tbsp butter
  • 1 yellow onion, diced
  • 1 carrot, diced
  • 1 tbsp tomato paste
  • 2 tbsp brandy
  • 1 bottle dry red wine, such as Beaujolais Villages
  • 2 garlic cloves, minced
  • 1 bay leaf
  • 1 tbsp thyme leaves
  • 4 tbsp parsley leaves, chopped
  • 1 cup chicken stock
  • 10 oz frozen pearl onions (or blanched and peeled)
  • 3/4 lb cremini mushrooms, cleaned, stemmed and quartered
Directions:
  1. Heat the oven to 325F. 
  2. Wash the chicken pieces and thoroughly dry them with paper towels.  Season them with salt and pepper and set aside.
  3. Place the bacon in a large Dutch oven and cook it over medium-high heat, stirring occasionally, until it is browned on the outside but not completely crispy.  Remove the bacon with a slotted spoon and set it aside on a plate.
  4. Dredge each chicken piece in flour, shaking off the excess.  
  5. Add 2 tbsp of butter to the bacon fat.  Once the butter has melted and has stopped foaming, add as many of the chicken pieces as will comfortably fit in the pan without overcrowding. Cook the chicken pieces until well browned on all sides, 4 to 5 minutes per side.  Remove the chicken to a plate and brown the remaining batches.
  6. Add another tbsp of butter to the Dutch oven and reduce the heat to medium.  Add the onion and carrot and cook, stirring occasionally, until the vegetables begin to brown, about 5 minutes.
  7. Add the tomato paste to the Dutch oven and stir well to so that it is well incorporated into the vegetables and fat. 
  8. Pour in the brandy and bring it to a boil. Scrape the bottom of the pan with a wooden spoon to stir up any brown bits.  Continue to boil until almost all of the liquid has evaporate, about 2 minutes.
  9. Add the wine, garlic, bay leaf, thyme, and 2 tbsp parsley to the Dutch oven.  Bring to a boil and cook until the wine is reduced by half, about 12 to 15 minutes.  
  10. Return the bacon to the pan and pour in the stock.  Bring the mixture to a boil, then reduce it to a simmer. Ladle out a half cup of the liquid into a cup for cooking the mushrooms and onions.  
  11. Add the chicken pieces, including the back, wing tips, and giblets, to the pan.  Add the pieces in layers.  
  12. Cover the Dutch oven and place it in the lower third of the oven. Braise it until the it is tender and cooked through, about an hour.  Flip the chicken pieces once or twice as they cook. 
  13. While the chicken braises, cook the onions and mushrooms.  Heat 1 tbsp butter in a large skillet over medium heat.  Add the onions  and cook, stirring occasionally, until they begin to brown, about 3 minutes.  Stir in the half cup of reserved braising liquid and reduce the heat to a simmer.  Cover the skillet and cook the onions, stirring them periodically, until they are tender, about 15 minutes.  Add 1 1/2 tbsp of butter to the pan and increase the heat to medium-high.  Once the butter stops foaming, add the mushrooms and season them with salt and pepper.  Cook the mushrooms and onions, stirring periodically, until they are browned and glazed with the braising liquid, about 10 minutes.  Remove them from the heat and set aside.
  14. Once the chicken is cooked, remove the chicken pieces from the Dutch oven and set them aside on a plate.  Discard the back, wing tips, and giblets.  
  15. Skim some of the fat from the braising liquid.  Bring the braising liquid to a boil and reduce it until it is slightly thickened, about 10 minutes.  Reduce the heat to a simmer. 
  16. Stir the onion and mushroom mixture into the braising liquid.  Let the liquid simmer for about 5 minutes to let the flavors meld.  Taste for salt and pepper.
  17. Spoon the braising liquid over the chicken pieces and garnish them with the remaining chopped parsley.  Serve immediately. 

Monday, November 23, 2009

Pulled Pork Made in the Oven

For a recent office potluck, I decided to honor my Southern heritage by cooking pulled pork. While there is no substitute for wood smoked pork butt, this recipe for beer braised pork butt is as good as any pulled pork dish that can easily be cooked in a New York apartment. If the number of requests I received from my co-workers is any indication, they agreed. The recipe is quite simple, it just takes the better part of an evening to make.

First, rub the bone-in pork butt in the spice mixture. A store-bought spice rub will do, but it's best if you make your own. The rub prescribed in the recipe lends the meat a smoky flavor that gives the dish slight semblance to authentic smoke pork. Let the pork marinate for at least an hour, preferably overnight. Before you are ready to cook the pork, let it come to room temperature.


Next, preheat the oven to 500F. Roast the pork until the pork blackens.


Remove the pork from the oven and reduce the heat to 325F. While the oven is cooling down, pour a 12 oz. dark beer over the pork and have one for yourself. I used Peak Organics Brown Ale. Surround the pork with several cloves of minced garlic. Finally cover it with heavy foil and poke several holes all over the foil to let some liquid escape. Let the pork braise until it is falling off the bone, about 2.5 hours. Remove the pork from the roasting pan and pour the braising liquid into a sauce pan.

Perfecting the braising liquid is key here as it will make for wonderfully moist meat. Add the ketchup, Worchestershire sauce, brown sugar, and dijon mustard to the liquid and let it simmer for about 20 minutes. Meanwhile, shred the pork with two forks:


Finally, mix as much of the liquid as desired back into the pork. It will look like too much liquid, but keep stirring it into the pork, as the meat will absorb lots of the braising liquid.


Serve the rest of the braising liquid with the pork. The pork is delicious by itself or a sandwich on a potato roll with cole slaw.

Sunday, November 8, 2009

Braised Chicken Thighs with Mushrooms and Bacon


By now, it should be no secret that braising is my favorite cooking method. Aside from the obvious attractiveness of braising (makes delicious leftovers, uses inexpensive cuts of meat, etc.), I love braising because I am comfortable and confident enough with it that I do not need to use a recipe to come up with a flavorful dish. As long as you follow the basic formula of browning the meat, sauteing the aromatics, deglazing the pan, adding the braising liquid, and cooking until the meat is tender, you are virtually guaranteed a nice meal.

All I did with for the below recipe was to follow the aforementioned technique using the ingredients that I had on hand. Braising really is that easy. These braised chicken thighs have a wonderfully rich and earthy sauce thanks to the mushrooms and bacon. Serve them over polenta to soak up the liquid.

Braised Chicken Thighs with Mushrooms and Bacon
Serves 4

Ingredients:
  • 8 bone-in chicken thighs
  • Salt and pepper
  • 3 slices bacon, chopped
  • 1 medium yellow onion, finely chopped
  • 10 oz. button mushrooms, thinly sliced
  • 3 garlic cloves, minced
  • 1/2 cup dry white wine or vermouth
  • 1/2 cup chicken stock
  • 1/4 cup chopped parsley
Directions:
  1. Season the chicken thighs with salt and pepper. Set aside.
  2. In a deep skillet over medium heat, saute the bacon until beginning to brown, about 5 minutes. Remove the bacon with a slotted spoon and drain on a paper towel-lined plate.
  3. Add the chicken thighs to the skillet, careful not to crowd them. If necessary, cook in two batches. Cook the chicken thighs until well browned, 3 to 5 minutes per side. Set chicken aside on a plate.
  4. Pour off all but 2 tablespoons of fat from the pan. Add onions, garlic, and mushrooms to skillet. Cook, stirring occasionally, until the mushrooms begin to brown and have released their moisture, about 10 minutes.
  5. Pour the wine into the skillet and bring to a boil. Stirring up any brown bits that have stuck to the bottom of a pan with a wooden spoon, reduce the wine by half, about 4 minutes.
  6. Add the stock to the pan and bring to a boil. Reduce to a simmer and add the chicken thighs. Cover and cook until the chicken is cooked through, approximately twenty minutes, turning once. Remove the chicken to a warmed plate.
  7. If the sauce needs to be thickened, bring it to a boil and cook until it reaches a desired consistency. Stir in the parsley and season it with salt and pepper. Serve the chicken thighs with the braising liquid.

Tuesday, November 3, 2009

Pork Ribs Braised in Vietnamese Caramel Sauce


The most important ingredient of this rich pork braise is the bittersweet Vietnamese caramel sauce, which gives the braising liquid its dark hue and robust flavor. The key to a perfect caramel sauce is to brown the sugar just shy of the point at which it becomes a black, burnt mess and ruins your pan. As frightening as that may sound, I highly recommend following Andrea Nguyen's recipe and technique for making caramel sauce, which can be found here, along with some extremely helpful photos.

Once you have made the caramel sauce, rest of the recipe will be easy, albeit somewhat time consuming with the marinading and braising time. Although the it calls calls for country cut pork ribs, I would think it would work equally well with other fatty cuts of pork, dark meat chicken, or beef; just adjust the braising time accordingly.

Pork Ribs Braised in Caramel Sauce
Adapted from Andrea Nguyen's Into the Vietnamese Kitchen

Ingredients:

  • 3 lbs country cut pork riblets (ask your butcher to cut the whole ribs crosswise through the bone into long strips)
  • 1 small yellow onion, finely chopped
  • 1 tbsp sugar
  • 1 tsp ground black pepper
  • 6 tbsp fish sauce
  • 6 tbsp caramel sauce (recipe here)
  • 1 cup water, plus more if needed
Directions:

  1. Trim the ribs of any excess fat.
  2. In a large bowl, mix the onion, sugar, pepper, and 3 tablespoons of the fish sauce. Add the riblets and stir well to coat with the marinade. Refrigerate overnight.
  3. Preheat the broiler. Remove the riblets from the marinade (reserve the marinade) and broil until browned on each side, about 9 minutes per side. Set aside on a plate.
  4. Place the riblets in a braising dish or a large skillet with deep sides. Add any juices that have collected on the plate, along with the reserved marinade, caramel sauce, and remaining fish sauce. Pour in enough water to cover the riblets by two-thirds.
  5. Bring the braising liquid to a boil, then reduce to a gentle simmer and cover. Cook for 45 minutes. Uncover the braising dish and turn the ribs. Increase the heat to a vigorous simmer and continue to cook uncovered for 20 minutes or until the pork is very tender. Serve with steamed rice.

Monday, October 19, 2009

Braised Tuna with Radicchio, Chickpeas, and Rosemary


The other day, I made Braised Tuna with Radicchio, Chickpeas, and Rosemary from Molly Stevens' wonderful All About Braising. Braising may sound like a terrible way to cook a nice piece of tuna, but the recipe works beautifully. The key is to keep the braising liquid at the gentlest of simmers, cooking the tuna just enough so that it remains pink on the inside. I cooked two 1.25 inch thick steaks for 8 minutes. The braising liquid is infused with the strong flavors of rosemary and radicchio, and the chickpeas lend the dish additional heartiness. This is an easy one pot meal, with the only necessary accompaniment being a baguette to soak up the delicious sauce.

Tuesday, October 13, 2009

Veal Ricotta Polpottone

Veal ricotta meatballs from Molly Stevens' All About Braising, served with roasted fingerling potatoes:

Friday, July 10, 2009

Braised Soy Chicken with Thai Basil

For simple weeknight meals, I often turn to braised chicken dishes. They take very little time to prep and cook, tend to be friendly on the wallet, and provide me with plenty of leftovers to enjoy over the course of the week. Serve this Asian-style braised chicken with plenty of rice to soak up the braising liquid. If you can't find Thai basil, lemon juice would be another nice addition to the sauce.

Soy Braised Chicken with Thai Basil
Serves 4

Ingredients:
  • 2 lbs. chicken thighs and drumsticks
  • Salt
  • 3 tbsp. peanut oil
  • 8 cloves garlic, smashed with the side of a knife
  • 1 1-inch piece of ginger, peeled and minced
  • 1/3 cup Shaoxing wine (or dry sherry)
  • 1/4 cup soy sauce
  • 1 tbsp. double black soy sauce (a thicker, sweeter soy sauce)
  • 1 tbsp. sugar
  • 1/2 cup Thai basil, chiffonade

Directions:
  1. Lightly salt the chicken pieces.
  2. Heat the oil in a large, deep-sided skillet over medium-high heat.
  3. Add the chicken pieces to the skillet without crowding and cook until browned on both sides, about 5 minutes per side. If necessary, cook chicken in batches.
  4. Add garlic and ginger to skillet and cook until fragrant, about 1 minute.
  5. Add wine, soy sauces, and sugar to skillet. Boil, stirring constantly, for 5 minutes.
  6. Reduce heat to low and simmer until chicken is cooked through, about 5 minutes more. Remove from heat.
  7. Stir in Thai basil and serve.

Tuesday, April 7, 2009

Chicken Cacciatore


I do love my no-fuss recipes, especially on work nights. As the story goes, hunters would make cacciatore ("hunter-style") chicken with the ingredients they carried along on their hunts. The story may be far-fetched, but this really is an easy dish to cook. Serve it over plenty of polenta to soak of the braising liquid.

Chicken Cacciatore
Serves 4

Ingredients:
  • 3 lbs. chicken drumsticks and thighs, washed and thoroughly dried
  • Salt and pepper
  • 2 Tb olive oil
  • 1 medium yellow onion, thinly sliced
  • 4 cloves garlic, minced
  • 3 carrots, peeled and sliced into 1/4 inch pieces
  • Large handful of shiitake mushrooms, sliced
  • 1 tsp. juniper berries, crushed
  • 1 cup dry white wine
  • 1 cup canned tomatoes with juice, chopped

Directions:
  1. Heat olive oil over med-high heat in a deep skillet.
  2. Season chicken with salt and pepper. Add to skillet, skin side down. Do not crowd; if necessary brown chicken in two batches. Cook chicken until well browned, about 5 min. per side. Remove to plate.
  3. Discard all but 1 Tb of fat in skillet. Reduce heat to medium and add onion, garlic, carrots, mushrooms, and juniper berries. Cook, stirring occasionally, until vegetables soften, about 8 minutes.
  4. Add wine to skillet and let come to a boil, increasing heat if necessary. Boil for a minute.
  5. Add tomatoes to pan, and stir to mix liquids. Add chicken to pan reduce heat to low; bring to a simmer and partially cover skillet. Simmer until chicken is cooked through, about 25 minutes, turning chicken mid way through cooking.


Sunday, April 5, 2009

Braised Pork Chops and Cabbage


Last night, I made this simple recipe for braised pork chops with cabbage from Molly Stevens' All About Braising. Cabbage goes extremely well with pork dishes, and this one is no exception.

Braised Pork Chops and Cabbage
Serves two

Ingredients:
  • 2 thick bone-in pork chops
  • Salt and pepper
  • Flour, for dredging
  • 2 Tb olive oil
  • 2 Tb butter
  • 1 tsp. celery seeds
  • 1 tsp. mustard seeds
  • 1 shallot, sliced
  • 1/2 head of green cabbage, leaves sliced into thin strips
  • 1/2 cup dry vermouth
  • 2/3 cup chicken broth
  • 1 Tb. cider vinegar
  • 1/4 cup heavy cream
Directions:
  1. Season pork chops with salt and pepper. Dredge both sides with flour.
  2. Heat olive oil in deep skillet over medium high-heat. Add pork chops and cook until brown on both sides, about four minutes per side. Remove pork chops to plate.
  3. Melt butter in skillet over medium heat. Add the mustard and celery seeds until they begin to pop, about one minute.
  4. Add shallots to skillet and cook until soft, a couple of minutes.
  5. Add cabbage to skillet and season with salt and pepper. Reduce the heat to medium-low and cook until cabbage wilts, about 10-15 minutes, stirring occasionally.
  6. Add vermouth and let simmer for a couple of minutes. Add stock and vinegar to skillet and bring to simmer.
  7. Add pork chops to skillet and cover. Cook for abouth 20 minutes or until pork is cooked through, turning once.
  8. Once pork is cooked, transfer to plate. Add cream to skillet and bring to a slow boil. Cook until cabbage is creamy, about 5 minutes. Spoon cabbage over pork chops and serve.


Tuesday, March 24, 2009

Chicken Adobado

Tonight's dinner was Chicken Adobado from Molly Stevens' All About Braising. It's so simple: your marinade about 10 chicken thighs marinated for an hour in a mixture of a half cup each of water and white vinegar, zest from two limes, a large splash of soy sauce, two teaspoons of brown sugar, two bay leaves, and salt and pepper. Then you cook the chicken in a covered skillet for about 45 minutes, flipping the thighs occasionally. Finally, you brown the chicken in a second skillet while reducing the braising liquid in the original skillet. You add the chicken back to the sauce and serve it over rice with a simple salsa of chopped tomato, chopped onion, lime juice, and cilantro. My camera battery died, so the only evidence of the deliciousness that ensued is this iPhone photo:


Tuesday, March 17, 2009

Carnitas


During the week, I rarely have much time or energy to cook anything more than the simplest of dishes. For this reason, I tend to spend my Sunday nights tending to a braised dish on the stove or a roasted meat in the oven. This Sunday, I prepared carnitas, a Mexican dish consisting of cubed pork butt that is braised in spices until all of the liquid evaporates, and then fried in it's own fat (hey, I ran 15 miles this weekend!). The nice thing about carnitas is that it is so versatile. Having researched a number of recipes, I found that nearly anything combination of ingredients can be used so long as the basic technique is followed. Realizing that it was not necessary to follow a recipe, I decided to make my own, and I was proud of the result, which follows. In order to use up some the lager I bought for the pork, I served the carnitas with Drunken Beans made with Rancho Gordo vaqueros.


Carnitas

Ingredients:
  • 3 lb. pork butt, cut into 1.5 inch chunks
  • 2 yellow onions, chopped
  • 4 cloves garlic, minced
  • 1 poblano pepper, chopped
  • 1 chipotle pepper in adobo, minced
  • Juice of 1 orange
  • Juice of 1 lime
  • 1 Tb cumin ground
  • 2 tsp. dried ancho pepper, ground
  • 1 Tb dried marjoram
  • Salt, for seasoning
  • 12 oz. lager beer
  • Cilantrol leaves, for serving
  • Lime wedges, for serving
  • Tomatillo salsa, for serving
Directions:
  1. Add first 11 ingredients (up to the salt) to a large dutch oven. Marinate for several hours.
  2. Pour in beer and add water to barely cover pork. Simmer pork over moderate heat until meat easily falls apart, approximately 2 hrs.
  3. Increase heat to medium-high and continue to cook until liquid has completely reduced, another hour and a half.
  4. Once the only remaining liquid is the pork fat, watch pork carefuly. Cook the pork cubes or shreds, turning occasionally, until brown and crispy.
  5. Serve pork over rice or in warmed toritillas. Garnish with cilantro and serve with salsa.

Saturday, November 22, 2008

Salmon Braised in Pinot Noir with Mushrooms

pb1800021

In my last post, I noted the challenges of keeping a well-stocked pantry and how it is always a triumph when I am able to prepare a gourmet meal with ingredients I have on hand. In this regard, last night’s dinner was a triumph.

As four o’clock came around yesterday at work, my mind began to wander from spreadsheets to what I would cook for dinner. With cold weather rolling in, my fridge is always stocked with a supply of fall vegetables that go so well in braised dishes: carrots, leeks, and celery. I also had a pack of cremini mushrooms on hand that I had picked up on a whim at the grocery store last weekend. I searched for a way to use at least some of the ingredients I had on hand, and I came across this recipe from for salmon braised in Pinot Noir. The ingredients:

  • Salmon: would have to buy on my way home from work
  • Salt and pepper: on hand (duh)
  • Butter: in the fridge
  • Celery: in the fridge
  • Carrots: in the fridge
  • Leek: in the fridge
  • Tomato paste: in the fridge
  • Pinot Noir: on hand (surprisingly)
  • Bay leaf: in my pantry
  • Thyme: in the fridge (random Greenmarket purchase)
  • Chicken broth: in the freezer
  • Heavy cream: in the fridge

Could it be? A moderately complex meal that would only require an easy trip to the seafood market to pick up a couple of fillets of salmon? A triumph!

Unfortunately, I found the sauce slightly bland, so the meal was not a triumph on all levels. However, my girlfriend loved it, so I still put it in triumph territory. Perhaps this was the first step to keeping a well-stocked pantry…

LinkWithin

Related Posts with Thumbnails