Showing posts with label Italian. Show all posts

Monday, April 25, 2011

Bucatini with Pancetta, Fava Beans, and Tomato Sauce


Bucatini is my favorite dried pasta.  Nice and thick—about twice as thick as spaghetti—,it has a wonderful texture that allows a sauce coat each tube perfectly. Although bucatini can be difficult to track down, I was fortunate enough to spot some at Eataly.  The traditional method of serving the pasta i is all'Amatriciana, and I decided to go a similar route with the tomato sauce and pancetta, but it being the beginning of spring after a long, harsh winter, I couldn't resist tossing in some blanched fava beans for good measure.  The beans added wonderful texture and color to the buttery tomato sauce and al dente pasta.


Bucatini with Pancetta, Fava Beans, and Tomato Sauce
Serves 4

Ingredients:
  • 2 lbs fava beans, shelled
  • 2 tbsp olive oil
  • 1/4 lb pancetta, diced 
  • 2 cloves garlic, minced
  • 1 cup simple tomato sauce (I used Marcella Hazan's)
  • 1/4 tsp red pepper flakes
  • 1 lb bucatini
  • grated Pecorino Romano cheese, for serving
Directions:
  1. Bring a large pot of salted water to a boil.  Add the fava beans and let cook for 1 to 2 minutes.  Remove the fava beans with a slotted spoon and put them in a bowl of ice water.  Once cool, peel off the skins of the beans and set aside.  Keep the water at a boil.
  2. Add the bucatini to the boiling water and cook for one minute less than the package suggests. 
  3. While the bucatini boils, heat the olive oil in a saute pan over medium heat.  Add the pancetta and cook until it begins to crisp, about 3 minutes.  Add the garlic and red pepper flakes and let it cook until it is fragrant, about one minute.  Add the tomato sauce to the pan and bring to a simmer.  Stir in the fava beans and taste for seasoning. 
  4. Drain the pasta and stir it into the simmering sauce.  Let the pasta and sauce cook for another minute, stirring to ensure that the pasta strands are coated by the sauce.
  5. Serve the pasta in bowls, topped with grated Pecorino Romano cheese.  

Sunday, April 10, 2011

Ricotta Gnocchi


I made gnocchi once before, and while they weren't bad for a first attempt, they were not the light and fluffy pillows of pasta that I crave when I think about gnocchi.  Nearly two years later (time sure does fly, doesn't it!), I have made another attempt at gnocchi, and I think I finally figured it out this time around.  The key is to have extremely delicate touch when handling the dough.  As someone who has never been known for having a light touch—watch me do ten layups on a basketball hoop you'll see what I mean—I found this to be easier said than done. But just remind yourself every step of the way to have gentle hands, combining the ingredients of the dough just enough and rolling the dough as delicately as possible, and you will be well on your way to perfect gnocchi.  If my clumsy hands can do it, great gnocchi is certainly within anyone's reach.

Ricotta Gnocchi
Adapted from A16: Food + Wine
Serves 4

Ingredients:
  • 2 cups fresh sheep milk ricotta cheese
  • 2 tbsp olive oil
  • 3/4 tsp salt
  • 1 egg yolk
  • 1 egg, lightly beaten
  • 1 cup "00" pasta flour or all-purpose flour, plus more as needed
  • 1/2 cup semolina flour
Directions: 
  1. In a large bowl, combine the ricotta, olive oil, and 3/4 tsp salt.  Taste the mixture for seasoning and add more salt if necessary.  It should be fairly salty since the flour will even out the salt level.  
  2. Stir the ricotta mixture until it is smooth in appearance, with no large curds visible.
  3. Stir in the egg yolk and half of the beaten egg and stir until just combined.
  4. Find a large, clean work surface and coat it with 1/2 a cup of the "00" pasta flour.  Spread the ricotta mixture on top of the flour, and top it with the remaining 1/2 cup of "00" pasta flour.
  5. Using your hands, gently fold the flour onto the ricotta mixture.  Continue to do so just until the dough comes together.  The dough should be slightly sticky, but should not stick to your fingers.  If it is too sticky, fold in a bit more flour.  
  6. Lightly dust a large cutting board or other large work surface with semolina flour.  
  7. Divide the gnocchi dough into 6 pieces.
  8. Take one piece of the gnocchi dough and, using a very gentle touch, roll it in the semolina flour until it forms a long long about a 1/2 inch in diameter.  Repeat with the remaining pieces of dough.
  9. Using a sharp knife or pizza cutter, cut each log of dough into 1-inch pieces.  At this point, the gnocchi can be cooked or frozen for a later use.
  10. To cook the gnocchi, bring a large pot of salted water to a boil.  Add the gnocchi and wait for the pasta to float in the water, about two minutes; let the gnocchi cook for an additional minute after they float.  Using a mesh strainer, remove the gnocchi from pot.  Serve immediately with the sauce of your choice.  Pesto or a simple tomato sauce work particularly well.

Sunday, February 13, 2011

Cavatelli with Sausage & Browned Sage Butter


 As you may have noticed from the lack of posts on this blog the last few weeks, I have been very busy of late.  When I don't have time to cook, I usually fall into a boring routine of eating leftovers and takeout meals, but I do keep a few super simple recipes up my sleeve that take so little time and make such use of pantry and freezer staples that I have little excuse not to cook when pressed for time.  This pasta dish falls right into that category: store-bought fresh cavatelli (okay, maybe that's not such a pantry staple) tossed in a sausage and sage butter sauce.  The recipe, adapted from The Frankies Spuntino Kitchen Companion & Cooking Manual, which has quickly become a favorite of mine for simple recipes like this one, takes less than 30 minutes to prepare and you'd never know it because it's so full of flavor. 

Cavatelli Sausage & Browned Sage Butter
Adapted from The Frankies Spuntino Kitchen Companion & Cooking Manual

Serves 4

Ingredients:
  • 1 lb. hot Italian sausage links
  • 7 tablespoons butter
  • 10 sage leaves
  • pepper, to taste
  • 1 lb. fresh cavatelli
  • 1 cup grated Pecorino Romano cheese
  • 1/2 cup parsley leaves, finely chopped
Directions:
  1. Bring a large pot of salted water to a boil.
  2. Meanwhile, place the sausages in a large saute pan.  Fill the pan with enough water to come half way up the sausage links.  Heat the pan over medium heat and cook for 10 minutes.  Turn the sausages and cook on the other side for 5 minutes. Remove the sausages from the pan and slice into 1/2 inch slices.  Set the sausage aside.
  3. Melt 1 tablespoon of the butter over medium-high heat in a clean saute pan.  Add the sausage slices and let them cook, undisturbed, until they are well browned on one side, 3 to 4 minutes.  Flip the sausage slices and brown the other side, another 2 to 3 minutes.  Remove the sausage slices with a slotted spoon and place them on a paper towel-lined plate.  
  4. Return the pan to the burner and add the remaining 6 tablespoons of butter, pepper, and sage leaves to the pan.  Stir the butter with a wooden spoon, scraping the bottom of the pan to dislodge any brown bits.  Let cook until it is well browned, about 5 minutes.
  5. Meanwhile, while the butter sauce is browning, place the cavatelli into the boiling water and cook until al dente.
  6. Drain the pasta and add it to the butter.  Stir in the sausage and Pecorino Romano cheese and serve immediately, topping each serving with a pinch of the chopped parsley.

Thursday, January 27, 2011

Trippa alla Parmagiana in Photos

I'm not sure what's gotten into me of late, but I've cooked more offal in the last two weeks than I've ever eaten in my life.  Maybe it's a quarter life crisis I'm going through.  Or maybe it's the weekly six-plus inch snowfalls that NYC has been experiencing of late.  Or maybe it's the impending financial armageddon that all those loud mouths on CNN and Fox News keep speaking of that's persuaded me to master cooking the less desired cuts of meat.  Whatever's causing my recent fascination with offal, I'm enjoying the challenge.

My latest offal experiment was Trippa alla Parmigiana, a tomato-based stew full of the rubbery stomach lining of a cow that we all know as tripe.  It's a classic Italian dish, and I used Andrew Carmellini's recipe from Urban Italian.  Below is a photo log of the technique for making this simple stew that is so full of flavor that  those who are horrified by the thought of tripe might not even hate it all that much.

I have to admit, tripe is not one of the better-looking cuts, even as offal goes:


The rest of my mise en place:

First, I boiled the tripe in salted water for about 15 minutes:

Then I cut up the tripe into medium-size strips:


Next, I moved onto making the stew.  First up was the onions, which I sauteed in olive oil:


Then I coated the tripe pieces and the onions with a mixture of melted butter and red pepper flakes:


I added a white wine, a can of San Marzano tomatoes, and a mixture of veal and chicken stock and brought everything to a boil.


I then covered the stew and popped it into a 300F oven for 3 hours.  Once out, uncovered it, added a bunch of sliced carrots and celery, and allowed it to simmer on the stove for another hour until it was nice and thick:


I seasoned the stew and voila:


Oh wait, it needs one more thing to make it perfect:

Thursday, January 13, 2011

Prosciutto-Mozzarella Frittata


Prosciutto, mozzarella, basil, and tomatoes go well together in almost anything, whether it be a pizza, a salad, or a panini.  Frittatas happen to be my favorite vehicle for playing the game of "let me throw a bunch of ingredients together and see what happens," so when I spotted this recipe from Food and Wine for a frittata containing the Italian quartet of ingredients, I couldn't resist.  As expected, they worked flawlessly together even when mixed together with lots of eggs, producing a very filling and satisfying brunch dish.

As a note, I make all of my frittatas using Calphalon's frittata pan, a two skillet set that allows you to flip the frittata without creating a mess.  Given my tendency to be a klutz in the kitchen, the frittata pan has saved me many hours of wiping eggs from my stove and walls.  I highly recommend it.


Prosciutto-Mozzarella Frittata
Adapted from Food and Wine
Serves 6

Ingredients:
  • 10 large eggs
  • 1/4 cup milk
  • 2 tbsp Pecorino Romano cheese
  • 2 tbsp chopped basil
  • 3/4 tsp salt
  • 1/2 tsp pepper 
  • 3 tbsp olive oil
  • 2 medium shallots, thinly sliced
  • 1 plum tomato, cored, seeded, and diced
  • 4 slices prosciutto, cut into strips
  • 4 ounces fresh mozzarella, cubed
Directions:
  1. In a large bowl, beat together the eggs, milk, Pecorino Romano cheese, basil, salt, and pepper.
  2. Heat 2 tbsp of the olive oil in the deep half of a frittata pan over medium heat.  Add the shallots and cook until they soften, 2 to 3 minutes.  Add the prosciutto and tomato and cook for a minute.  Use a spatula to spread the tomatoes and prosciutto across the bottom of the pan so that they are well distributed.
  3. Add the egg mixture to the pan.  Use a spatula to push the cooked pieces of egg to the middle of the pan and allow the uncooked eggs to flow to the outer edges.  Cook for 3 minutes.
  4. Poke the mozzarella cheese into the eggs so that the cubes are evenly distributed.  Continue to cook the frittata until it is nearly set, another 5 to 7 minutes.  During the last 2 minutes of cooking, heat the remaining tablespoon of olive oil in the shallow half of the frittata pan set over medium heat.
  5. Place the shallow pan on top of the deep pan and flip the frittata.  Keeping the shallow pan covered with the deeper pan, cook the frittata for 4 minutes. 
  6. Uncover the shallow pan and continue to cook the frittata until it is completely set, approximately 5 minutes.
  7. Use a spatula to slide the frittata onto a plate and cut it into wedges for serving. 

Thursday, January 6, 2011

Porchetta


As the second weekend of the new year approached, I’m assuming that everyone’s resolutions to eat better are about to be postponed until January 1, 2012.  Who wants chicken breasts and brown rice when you can have a succulent pork shoulder wrapped stuffed with fennel and onions and wrapped with pancetta?  It’s time to fall of the wagon and have some porchetta.


Although the traditional porchetta involves roasting a whole pig, I decided that that may be just slightly too ambitious to do in a studio apartment, so my porchetta only uses meat from shoulder, one of the most flavorful and economical cuts of the pig.  Porchetta comes in many shapes and forms, and I like to keep mine simple so that the meat shines rather than the filling.  The only thing to really focus on is the pork.  Be sure to pick out a well-marbled pork shoulder with a thick fat cap on top which will keep the meat moist throughout the cooking process.  A fatty piece of pork will make falling off the wagon for porchetta all the more worth it. 


Porchetta
Serves 6 to 8

Ingredients:
  • 1 3 to 4 lb. boneless pork shoulder, butterflied
  • salt and pepper
  • 3 tbsp olive oil
  • 1 large yellow onion, thinly sliced
  • 1 fennel bulb, cored and thinly sliced
  • 6 garlic cloves, peeled and smashed
  • 1 tbsp rosemary, chopped
  • 1 tbsp fennel seeds, toasted
  • 1 tbsp black peppercorns, toasted and ground
  • 1/2 cup fresh breadcrumbs
  • 1 egg
  • 1/4 lb. pancetta
Directions: 
  1. Preheat the oven to 350F
  2. Season the pork on all sides with salt and pepper.
  3. Heat the olive oil in a medium skillet over medium heat.
  4. Add the fennel, onion, garlic, fennel, rosemary to the skillet and season with salt and pepper.  Cook, stirring occasionally, until the vegetables are very soft, about 10 minutes. Remove the onion and fennel from the pan and allow to cool to room temperature in a medium bowl.
  5. Once the fennel and onion mixture is at room temperature, mix in the fennel seeds, peppercorns, breadcrumbs, and egg, stirring well to combine.
  6. Tie the pork shoulder with butchers twine, tying knots spaced one-inch apart across the length of the pork shoulder.
  7. Put the pork shoulder in a small roasting pan or large skillet so that the fat cap is facing up. Drape the pancetta on top of the pork loin so that it is entirely covered. You will likely have some pancetta leftover. 
  8. Roast the pork shoulder until the internal temperature in the thickest part of the meat reaches 160F, 1.5 to 2 hours.
  9. Remove the porchetta from the pan and allow it to rest for 10 minutes.
  10. Slice the porchetta in 1-inch thick pieces and serve with the crispy bits of pancetta.  


    Thursday, December 23, 2010

    Manicotti filled with a Little Something Something


    One of my favorite meals growing up was my mother's manicotti.  I always assumed it just like all the other mom foods we love.  Crepes filled with ricotta cheese and topped with a little tomato sauce.  Easy, right?

    I thought wrong.  After making these lamb-filled crepes this weekend, I now realize that I should have given my mom more credit for her manicotti.  Everything on down to the crepes was easy to prepare, but those pancakes sure were a doozy!  The technique sounded easy enough to me: a little butter in a non-stick pan, swirl the batter around, cook, flip, and cook a bit more.  But after several ugly, broken crepes and more batter over the Significant Eater's stovetop than she wants to know, I realized that I had to make some changes to my crepe technique.  I finally figured that the key to a good crepe is to keep it thin, stupid.  By putting just enough batter to cover the pan, the crepe will nearly cook through so that when you flip it, it will stay in tact.  Once I figure that out, I was a crepe-making machine, turning out a flawless crepe every few minutes.

    Aside from the crepe part, this dish is the simple kind of component cooking I love.  It sounds intricate— braised meat, crepes, tomato sauce#151;but every component can be made well ahead of time.  Even better, you can turn this dish into anything you please by using the flavor profile of your choosing.  While I used braised lamb and flavored the ricotta with mint,  you could try braised pork shoulder and sage-flavored ricotta, or short ribs with rosemary ricotta.  Even crab and parsley ricotta with a pink sauce.  To that end, in order to keep you all on your creative tiptoes, I've made this recipe as ambiguous as possible. 


    Manicotti filled with the Cook's Choice

    Ingredients:

    For the crepes:
    1. 2 cups whole milk
    2. 1 1/2 cups plus 2 tbsp flour
    3. 4 eggs, lightly beaten
    4. 4 tbsp butter, melted
    5. 1/2 tsp salt

    For the ricotta filling:
    • 2 lbs braised meat of your choice, shredded with a fork
    • 1/4 cup herbs of your choice
    • 1/4 tsp red pepper flakes
    • 3 cloves garlic, minced
    • 2 cups good-quality fresh ricotta cheese
    • Tomato sauce of your choice, preferably homemade
    • Pecorino Romano cheese, grated
    Directions:
    1. Mix the crepe ingredients together in a large bowl.  Strain and refrigerate overnight.
    2. Mix together the ingredients for the crepe filling.
    3. Heat the tomato sauce.
    4. Preheat the oven to 375F.
    5. To make the crepes, heat a medium-size nonstick pan over medium heat and brush it with melted butter.  Ladle a quarter cup of the crepe batter into the pan and swirl the batter around so that the bottom of the pan is entirely coated (you want the crepe to be very thin).  Let the crepe cook for 1 to 2 minute until it is nearly cooked through.  Carefully flip the crepe and cook the other side for another minute.  Remove the crepe to a plate.  Repeat this technique with the rest of the batter, stacking the crepes on a plate.  This should make approximately 15 to 20 crepes.
    6. To make the manicotti, fill the center of each crepe with about 1/3 cup of the ricotta filling.  Wrap each crepe and place seam-side down in a greased casserole dish.  
    7. Place the casserole dish in the oven and cook until the sides of the manicotti begin to brown, 7 to 10 minutes.
    8. Top the manicotti with the heated tomato sauce and grated Pecorino Romano cheese and serve immediately.


    Sunday, November 7, 2010

    Spaghetti with Anchovies and Caramelized Onions

    On my recent shopping trip to Eataly, I picked up a can of salt-packed anchovies. Whole salt-packed anchovies are to oil-packed anchovy fillets what jarred oil-packed Italian tuna is to domestic water-packed canned tuna. Sure, they cost more and take a bit more effort to cook with, but the taste of salt-packed anchovies is levels above their oil-packed brethren.


    This simple pasta should appeal even to the anchovy-haters, of which we all know there are many. While the anchovy flavor is apparent, the dish is not fishy.  Combined with the caramelized onions, olive oil, and toasted breadcrumbs, the anchovies make a light sauce that is much more than the sum of its parts.

    It does take some time to fillet the anchovies, but the rest of this dish can be put together in under 30 minutes.  Unfortunately, as I had few anchovy-loving friends and did not want to rub my smelly anchovy fingers on my camera, I do not have any photos of filleting the fish, but it's quite easy.  First, rinse the salt off of each anchovy.  Then soak them in water for about 20 minutes, changing the water few times as they soak. Rinse them off and run the blunt side of a paring knife along each side of the fish to scrape off any scales.  Then, pluck off all of the fins.  Use the paring knife to butterfly each fish.  Pull each fish gently at the tale and pull out the backbone in one clean sweep.  Finally, cut each side of the fish into 3 even fillets.  Then you can relax as you throw together the rest of the dish.


    Spaghetti with Anchovies and Caramelized Onions
    Serves 4

    Ingredients:
    • 1 lb. spaghetti
    • 1/4 tbsp olive oil
    • 2 yellow onions, thinly sliced
    • 3 cloves garlic, thinly sliced
    • 1 tbsp crushed red pepper flakes
    • 6 salt-packed anchovies, filleted
    • 1/4 cup parsley
    • 1/2 cup toasted breadcrumbs
    Directions:
    1. Bring a large pot of salted water to a boil.   
    2. Heat 3 tbsp olive oil in a large skillet over medium heat.  Add the onions and cook, stirring occasionally, until they are very soft and golden brown in color, about 20 minutes.
    3. Add the remaining olive oil to the skillet and increase the heat to medium-high.  Add the garlic and red pepper flakes to the pan and cook until the garlic becomes very fragrant, about 1 minute.  
    4. Add the anchovies to the skillet.  Cook, stirring constantly, until the anchovies have completely broken down into the sauce, 3 to 5 minutes.  Reduce the heat to low.
    5. Cook the spaghetti in the boiling water until al dente.
    6. Stir the pasta and the parsley into the sauce.
    7. Serve the pasta in bowls, topped with a few spoonfuls of the toasted breadcrumbs.

    Tuesday, November 2, 2010

    First Impressions of Eataly

    During my recent staycation and blogging hiatus, I had the opportunity to visit Eataly, Mario Batali and Lidia and Joe Bastianich's recently opened Italian mega-grocery store near Madison Square Park.  If you can get yourself through the omnipresent crowds, the store—an attempt to clone the original Eataly in Turin— is quite impressive.  Offering a vast array of the best imported dry goods from the Italian motherland, fresh produce and top-quality meats from some of the best domestic producers, Eataly is definitely a welcome addition to the city's ever-expanding list of gourmet markets. 

    Once you get past the entrance of Eataly, where customers are packed to the brim standing in line at the gelato, espresso, and panini counters, one of the first things you will see is the impressive fish stand.  I cannot think of many other places in New York with such a wide selection of seafood.  For some reason, I thought that the mako shark might have been screaming my name.


    My favorite section of the gourmet grocery was the pasta section, where you can purchase just about any shape of dry pasta imaginable from a variety of authentic Italian producers, from small artisanal pasta makers to everyday Barilla.  The prices are reasonable, too. 


    Eataly's meat case is impressive. While pricey, it's packed with gorgeous cuts of beef, pork, lamb, and veal.  You can even find a nice selection of offal and fresh rabbit, which can be hard to track down in New York. One of these days, I will pick up some of the luxurious Piedmontese beef.


    And, I just have to add, I picked up a can of salt-packed anchovies from the dry goods section... but, you'll just have to wait and see what I whip up in a later post.


    I will have to return Eataly to try the breads baked in the wood-burning oven, but they certainly looked delicious.


    As you twist through the aisles and the crowds, there are plenty of treats to be found from cheeses (burrata!) to these sausages from Cesare Casella's Salumeria Rosi.


    In addition to the already-open Manzo, described as a "Piedmontese steakhouse," Eataly will also have a rooftop brewery and beer garden, which is to open in February.  In the meantime, you can find a great selection of Italian microbrews in the store as well as plenty of brews from Delaware's Dogfish Head Brewery, which is collaborating on the rooftop brewery.  Molto Mario must have put the Molto Malto beer on the shelf himself.


    If only I lived near Madison Square Park, I would undoubtedly stop at Eataly often on my way home from work to pick up some prepared foods and fresh pastas for dinners.  On second thought, my wallet is glad that I live nowhere near the store.


    Eataly received lots of press for its "vegetable butcher" gimmick, where an employee will clean and chop your vegetables free of charge, but the vegetables for sale are plenty beautiful on their own.  You're much better off taking these home and preparing them yourself.


    I'm a sucker for cured meats and cheeses, but the crowds hoarding the counters at these stations were insane.  I will get to them one of these days...


    Eataly is definitely worth a visit.  While the prices are high, they are not any worse—and in some cases they are better—than other gourmet markets in New York.  Best of all, the quality of the foods is apparent. While the crowds can make navigating through the store a bit of a hassle, most of the people wandering the aisles are just oglers; I was able to pick up the anchovies, some pasta, and a few cuts of meat and checkout in under twenty minutes.

    So, what Italian treat did I make after I returned home from Eataly? Stay tuned...

    Wednesday, September 22, 2010

    Brunch, Italian Style


    If you live in New York City, there will be a point when you tire of standard brunch fare, never wanting to see another eggs benedict no matter how gussied up the Hollandaise sauce may be.  You see, brunch is part of the weekend routine in New York, as revered as college football on Saturdays is in every place but New York.  Instead spending our Saturday afternoons watching players on TV duke it out over a pigskin, we New Yorkers duke it out amongst ourselves outside trendy restaurants waiting for crummy mimosas and heavy-handed omelettes.

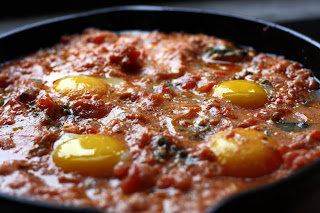
    At some point, most New Yorkers will realize that it is no longer worth spending $30 on food that can be made better at home and in an environment that does not require screaming at each other in order to be heard.  Should you come to that realization, or if you just want to invite some friends over for brunch, I urge you to make a pot of thick tomato sauce with a healthy dose of basil, cook some some eggs in the sauce, and serve it all over some crispy toast.  It will be an unconventional brunch, but a welcome respite from that New York brunch everyone grows to hate.  The Italians don't really do brunch, but judging by this dish, something tells me that I could tolerate the brunch scene in Italy. 

    Monday, September 20, 2010

    Bacon and Corn Risotto


    I love risotto almost as much as I love sweet summer corn, so corn risotto has been on my cooking wish list for some time.  I don't know what took me so long to make it, as it's a truly awesome dish, especially when enhanced with a healthy dose of bacon--corn and bacon are a match made in heaven.  The key to the risotto is the corn broth; you add the entire cob, all of the husk, and even the string to a pot full of water and allow it to simmer for an hour.  What you end up with is a light broth that imbues the risotto with wonderful corn flavor.

    Bacon and Corn Risotto
    Serves 2 to 3

    Ingredients:
    • 2 ears of corn, unshucked
    • 6 cups water
    • salt and pepper
    • 1/4 lb smoky bacon, diced
    • 1/2 yellow onion, diced
    • 1 cup Arborio rice
    • 1/2 cup white wine
    • 1 tbsp butter
    • 1/4 cup freshly grated Parmesan cheese
    Directions:
    1. Shuck the ears of corn, trimming off any browned parts of the husks.  Place the husks and the strings in a large stock pot.  
    2. Remove the kernels from the corn cobs and set them aside in a bowl.  Chop each cob into three equal-sized pieces and add them to the stock pot.
    3. Fill the stock pot with 6 cups of water and bring it to a boil.  Reduce the heat to a simmer and partially cover the pot.  Simmer the corn trimmings for 1 hour.  Season with salt and pepper and keep the corn broth warm.  
    4. Add the bacon to a medium-size saucepan and heat over medium heat.  Cook, stirring occasionally, until the bacon is slightly crispy, about 3 minutes.  Remove the bacon with a slotted spoon and set it aside.
    5. Pour off all but 2 tbsp of bacon fat from the pan and reduce the heat in the pan to medium-low.  Add the onion.  Cook, stirring occasionally, until the onion is soft and translucent, about 10 minutes.
    6. Increase the heat to high.  Add the rice and cook, stirring constantly, until the rice begins to crackle, about 2 minutes.
    7. Pour the wine into the sauce pan.  Stir the contents of the pan constantly until the rice has absorbed all of the wine, 1 to 2 minutes.  
    8. Reduce the heat to medium.  Holding a strainer over the saucepan, ladle in just enough of the corn broth to cover the rice.  Keeping the risotto at a simmer, constantly stir the rice until it has absorbed nearly all of the broth.
    9. Stir the corn kernels into the rice.  Passing the brother through the strainer, add enough to barely cover the rice.  Stir the rice until it has absorbed the broth.  
    10. Continue to add just enough broth to cover the rice and stir it constantly until the rice is soft and the risotto is creamy.  This will require at least 2 cups of broth total. 
    11. Remove the saucepan from the heat.  Stir in the butter and Parmesan cheese.  Season the risotto with salt and pepper and serve immediately.
      

    Monday, August 23, 2010

    Pork Cheek Ravioli with Brown Butter Sage Sauce


     The inspiration for this dish began at Dickson's Farmstand Meats, which has become my butcher of choice in New York, not only for its dedication to selling humanely raised meats from local farmers, but also for the more esoteric cuts of meat that it sells.  It was at Dickson's that I spotted a sign for pork cheeks, and, as is the case with most meats that I am utterly clueless about cooking, I could not resist purchasing a pound of them.


    The one thing that I did know about pork cheeks was that they are a tough cut best suited to braising.  However, it being mid-August, a heavy braised dish was not exactly tempting.  I thought about making a pork cheek ragu, but that seemed too much within my comfort zone; I needed to do the pork cheeks some justice.  Staying on the pasta path, I decided that a ravioli stuffed with braised pork cheek would be the perfect way to serve pork cheeks in the summer.  The one problem was that I do not own a pasta maker.  However, I remembered hearing that it was possible to make ravioli using wanton wrappers, and that is exactly what I did.


    The results could not have been better.  The braised pork cheeks required three hours of braising time before they were meltingly tender.  Surprisingly, the delicate wanton wrappers were a pretty close substitute for freshly made pasta.  To ensure that the pork cheeks kept the lead role in the dish, I topped the pasta with a simple brown butter sage sauce, which I brightened with lemon juice to pare down the richness of the pork.  On my way home from the butcher, I had been worried about how I would manage to ruin the pork cheeks, but I can't imagine having them any better way. 


    Pork Cheek Ravioli with Brown Butter Sage Sauce
    Serves 4 

    For the pork:
    • 1 lb. boneless pork cheeks
    • salt and pepper
    • 2 tbsp olive oil
    • 2 cloves garlic, minced
    • 1 carrot, finely diced
    • 1 medium yellow onion, finely diced
    • 1/2 cup dry red wine
    • 1/2 cup canned diced tomatoes with their juice
    • 1 cup chicken stock
    • 1 bay leaf
    • 1 tsp fresh thyme leaves
    • 1/2 tsp dried red pepper flakes
    For the pasta:
    • 20 wanton wrappers
    • 4 tbsp unsalted butter
    • 10 sage leaves
    • juice from 1/2 lemon
    • salt and pepper
    • grated Pecorino Romano cheese, for serving
    Directions:

    For the pork (can be made one day ahead):
    1. Preheat the oven to 275F.
    2. Pat the pork cheeks dry with paper towls.  Season with salt and pepper.
    3. Heat the olive oil in a medium braising dish over medium-high heat.  Add the pork cheeks without crowding (cook in batches if necessary), and saute until well-browned on both sides, about 2 minutes per side.  Set the pork cheeks aside on a plate.
    4. Reduce the heat to medium and add the garlic, carrot, and onion.  Cook, stirring occasionally, until the vegetables soften and begin to brown, 5 to 10 minutes.
    5. Add the wine and bring it to a boil.  Reduce the wine by half, about 3 minutes.
    6. Pour in the tomatoes, stock, bay leaf, thyme, and pepper flakes.  Bring the liquid to a boil, then reduce the heat to a simmer.  Add the pork cheeks and any juices that have accumulated on the plate.  Season the dish with salt and pepper. 
    7. Cover the braising dish and place it in the oven.  Cook, flipping the pork the until the the pork cheeks can be easily shredded with a fork, approximately 3 hours.
    8. Remove the pork cheeks from the braising dish and set them aside on a plate.  If necessary, reduce the braising liquid so that it has almost a syrup-like consistency.  Season with salt and pepper. 
    9. Shred the pork cheeks with a fork and return to the braising liquid. Gently warm the dish prior to filling the ravioli.
    For the pasta:
    1. Bring a large pot of salted water to a boil.  Reduce the heat to a steady simmer (any more than a simmer will break the ravioli).
    2. Lay each of the wanton wrappers on a large flat surface.  Using a brush or your finger, wet the edges of half of the wrappers.  
    3. Place approximately 1 tbsp of the braised pork, with a bit of the braising liquid, on the ravioli with wet edges. 
    4. Place the remaining wanton wrappers over the pork, forming the ravioli.  Press down on the edges of each ravioli with your fingers to ensure that the edges stick together.  
    5. Use a fork to press down on the edges of each ravioli to form ridges.
    6. Place the ravioli in the pot of simmering water one at a time to ensure that they do not stick.  Cook until the ravioli float to the top of the water, approximately two minutes.  Carefully remove each ravioli from the pasta water with a slotted spoon.  Place 5 ravioli on each plate.
    7. As the ravioli cook, make the sauce by heating the butter over medium heat.  Once the butter has melted and begins to brown, remove it from the heat.  Stir in the sage leaves and lemon juice and taste for salt and pepper.  
    8. Pour a few spoonfuls of the brown butter sage sauce over the ravioli.  Top each plate with a small amount of grated Pecorino Romano.  Serve immediately. 

    Sunday, August 15, 2010

    Italian Seafood Stew


     Stew in mid-August? No thank you.  Seafood stew? Well, now that you mention it...

    Italian seafood stew, tomato-based and chock full of just about any seafood you want, is one of my favorite dishes that I have made this summer.  I used a recipe from Marco Canora's Salt to Taste, spiking the tomatoes with plenty of lemon and tossing in calamari, little neck clams, mussels, shrimp. and cod.  However, hot summer days are not meant to be spent fretting over recipes, so toss in whatever spices and seafood you like.  Just keep main components the same-- a soffrito of celery, fennel, and onions, a can of crushed tomatoes, a splash of white wine, and some perfectly cooked seafood-- and you are guaranteed a great seafood stew that, when washed down with a crisp white wine, just might take you from a small studio apartment to a beach on the Amalfi Coast.  Unfortunately for this New Yorker, I was quickly awakened from my dream by a truck barreling down Second Avenue, but I plan to revisit it by making this stew at least one more time this summer.   

    Tuesday, May 11, 2010

    Thomas Keller's Ad Hoc Meatballs


    Meatballs are all the rage in New York these days, appearing on menus all over city.  Hell, there's even The Meatball Shop, a Lower East Side restaurant dedicated to all things meatball.  Naturally, I decided to make meatballs at home this past weekend using Thomas Keller's recipe from  Ad Hoc at Home.  Why leave my apartment for meatballs when I could make my own using a recipe from one of the best chef's in the country? 

    It's hard to pinpoint exactly what makes the Ad Hoc meatballs so great.  The mixture is fairly traditional: ground chuck, sirloin, pork, and veal, an egg, breadcrumbs, parsley, sauteed garlic and onions, salt and pepper.  I suspect it's the combination of ground meats that makes the difference, giving each meatball the perfect fat ration. 


     One of the key touches to Keller's meatballs is a small cube of fresh mozzarella cheese that gets inserted into the middle of each meatball prior to cooking them.


    In my limited meatball experiences, I have only braised them in tomato sauce.  Keller's are roasted at 425F.  I was concerned that roasting at a high temperature would dry out the meatballs, but the combination of meats and cheese keeps these quite moist.  As anal as Keller supposedly is in the kitchen, I'm sure he would discard any meatball that springs a mozzarella leak, but I think it just makes it more enticing.  Significant Eater actually insisted on being served this one. 


    I topped Keller's meatballs with Marcella Hazan's classic tomato-butter sauce, making it a old school meets new school meal. 

    LinkWithin

    Related Posts with Thumbnails