Showing posts with label pork. Show all posts

Thursday, January 6, 2011

Porchetta


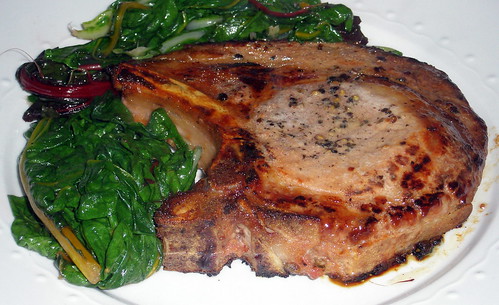
As the second weekend of the new year approached, I’m assuming that everyone’s resolutions to eat better are about to be postponed until January 1, 2012.  Who wants chicken breasts and brown rice when you can have a succulent pork shoulder wrapped stuffed with fennel and onions and wrapped with pancetta?  It’s time to fall of the wagon and have some porchetta.


Although the traditional porchetta involves roasting a whole pig, I decided that that may be just slightly too ambitious to do in a studio apartment, so my porchetta only uses meat from shoulder, one of the most flavorful and economical cuts of the pig.  Porchetta comes in many shapes and forms, and I like to keep mine simple so that the meat shines rather than the filling.  The only thing to really focus on is the pork.  Be sure to pick out a well-marbled pork shoulder with a thick fat cap on top which will keep the meat moist throughout the cooking process.  A fatty piece of pork will make falling off the wagon for porchetta all the more worth it. 


Porchetta
Serves 6 to 8

Ingredients:
  • 1 3 to 4 lb. boneless pork shoulder, butterflied
  • salt and pepper
  • 3 tbsp olive oil
  • 1 large yellow onion, thinly sliced
  • 1 fennel bulb, cored and thinly sliced
  • 6 garlic cloves, peeled and smashed
  • 1 tbsp rosemary, chopped
  • 1 tbsp fennel seeds, toasted
  • 1 tbsp black peppercorns, toasted and ground
  • 1/2 cup fresh breadcrumbs
  • 1 egg
  • 1/4 lb. pancetta
Directions: 
  1. Preheat the oven to 350F
  2. Season the pork on all sides with salt and pepper.
  3. Heat the olive oil in a medium skillet over medium heat.
  4. Add the fennel, onion, garlic, fennel, rosemary to the skillet and season with salt and pepper.  Cook, stirring occasionally, until the vegetables are very soft, about 10 minutes. Remove the onion and fennel from the pan and allow to cool to room temperature in a medium bowl.
  5. Once the fennel and onion mixture is at room temperature, mix in the fennel seeds, peppercorns, breadcrumbs, and egg, stirring well to combine.
  6. Tie the pork shoulder with butchers twine, tying knots spaced one-inch apart across the length of the pork shoulder.
  7. Put the pork shoulder in a small roasting pan or large skillet so that the fat cap is facing up. Drape the pancetta on top of the pork loin so that it is entirely covered. You will likely have some pancetta leftover. 
  8. Roast the pork shoulder until the internal temperature in the thickest part of the meat reaches 160F, 1.5 to 2 hours.
  9. Remove the porchetta from the pan and allow it to rest for 10 minutes.
  10. Slice the porchetta in 1-inch thick pieces and serve with the crispy bits of pancetta.  


    Tuesday, December 14, 2010

    Ground Pork with Shrimp Paste and Lemongrass


    I'll be the first to admit that shrimp paste isn't for the squeamish.  Pungent—and not in a good way—and pasty, for lack of a better word, the ingredient made of ground fermented shrimp might scare away even the most adventurous foodies.  However, as any lover of Southeast Asian cuisine is aware, shrimp paste makes pretty much everything taste better.  Just take Thai curry or papaya salad: yup, you guessed it, shrimp paste is an active player in their deliciousness.  As much as I try, I can't quite live off of curry and papaya salad, so I'm always looking for new ways to use up some of the jar of shrimp paste in my fridge. This pork recipe, loosely adapted from Andrea Nguyen's Into the Vietnamese Kitchen, was one of those attempts.  Typical of most Southeast Asian dishes, this one plays off of a contrast of flavors, with sweet, salty, and spicy well represented.  I still have half a jar of shrimp paste left, but I suspect I'll be purchasing more in no time.


    Ground Pork with Shrimp Paste and Lemongrass
    Serves 4

    Ingredients:
    3 tbsp peanut oil
    3 dried Thai chiles
    4 cloves garlic, minced
    3 lemongrass stalks, trimmed, cut in thirds, and pounded with the flat side of a knife
    1/2 pound ground pork
    12 shrimp, peeled, deveined, and minced
    1 tbsp sugar
    2 tbsp shrimp paste, diluted in 1/4 cup warm water
    1 tsp sesame seeds
    2 Kirby cucumbers, thinly sliced

    Directions:
    Heat the oil in a large skillet over medium-high heat.
    Add the chiles to the skillet and cook, stirring occasionally until they are fragrant and blackened.
    Add the garlic and lemongrass to the skillet and cook until the garlic is fragrant, about 1 minute.
    Add the pork to the skillet.  Use the back of a wooden spoon to break the pork up as it cooks, and cook until the meat is no longer pink, about 3 minutes.
    Stir in the shrimp, sugar, and shrimp paste and cook for about ten minutes, stirring occasionally, until the mixture caramelizes, turning a reddish brown.  If the pan dries out, add a tablespoon of water at a time.
    Remove the mixture from the pan and serve immediately with rice, topped with sesame seeds and garnished with the cucumbers.

    Monday, August 23, 2010

    Pork Cheek Ravioli with Brown Butter Sage Sauce


     The inspiration for this dish began at Dickson's Farmstand Meats, which has become my butcher of choice in New York, not only for its dedication to selling humanely raised meats from local farmers, but also for the more esoteric cuts of meat that it sells.  It was at Dickson's that I spotted a sign for pork cheeks, and, as is the case with most meats that I am utterly clueless about cooking, I could not resist purchasing a pound of them.


    The one thing that I did know about pork cheeks was that they are a tough cut best suited to braising.  However, it being mid-August, a heavy braised dish was not exactly tempting.  I thought about making a pork cheek ragu, but that seemed too much within my comfort zone; I needed to do the pork cheeks some justice.  Staying on the pasta path, I decided that a ravioli stuffed with braised pork cheek would be the perfect way to serve pork cheeks in the summer.  The one problem was that I do not own a pasta maker.  However, I remembered hearing that it was possible to make ravioli using wanton wrappers, and that is exactly what I did.


    The results could not have been better.  The braised pork cheeks required three hours of braising time before they were meltingly tender.  Surprisingly, the delicate wanton wrappers were a pretty close substitute for freshly made pasta.  To ensure that the pork cheeks kept the lead role in the dish, I topped the pasta with a simple brown butter sage sauce, which I brightened with lemon juice to pare down the richness of the pork.  On my way home from the butcher, I had been worried about how I would manage to ruin the pork cheeks, but I can't imagine having them any better way. 


    Pork Cheek Ravioli with Brown Butter Sage Sauce
    Serves 4 

    For the pork:
    • 1 lb. boneless pork cheeks
    • salt and pepper
    • 2 tbsp olive oil
    • 2 cloves garlic, minced
    • 1 carrot, finely diced
    • 1 medium yellow onion, finely diced
    • 1/2 cup dry red wine
    • 1/2 cup canned diced tomatoes with their juice
    • 1 cup chicken stock
    • 1 bay leaf
    • 1 tsp fresh thyme leaves
    • 1/2 tsp dried red pepper flakes
    For the pasta:
    • 20 wanton wrappers
    • 4 tbsp unsalted butter
    • 10 sage leaves
    • juice from 1/2 lemon
    • salt and pepper
    • grated Pecorino Romano cheese, for serving
    Directions:

    For the pork (can be made one day ahead):
    1. Preheat the oven to 275F.
    2. Pat the pork cheeks dry with paper towls.  Season with salt and pepper.
    3. Heat the olive oil in a medium braising dish over medium-high heat.  Add the pork cheeks without crowding (cook in batches if necessary), and saute until well-browned on both sides, about 2 minutes per side.  Set the pork cheeks aside on a plate.
    4. Reduce the heat to medium and add the garlic, carrot, and onion.  Cook, stirring occasionally, until the vegetables soften and begin to brown, 5 to 10 minutes.
    5. Add the wine and bring it to a boil.  Reduce the wine by half, about 3 minutes.
    6. Pour in the tomatoes, stock, bay leaf, thyme, and pepper flakes.  Bring the liquid to a boil, then reduce the heat to a simmer.  Add the pork cheeks and any juices that have accumulated on the plate.  Season the dish with salt and pepper. 
    7. Cover the braising dish and place it in the oven.  Cook, flipping the pork the until the the pork cheeks can be easily shredded with a fork, approximately 3 hours.
    8. Remove the pork cheeks from the braising dish and set them aside on a plate.  If necessary, reduce the braising liquid so that it has almost a syrup-like consistency.  Season with salt and pepper. 
    9. Shred the pork cheeks with a fork and return to the braising liquid. Gently warm the dish prior to filling the ravioli.
    For the pasta:
    1. Bring a large pot of salted water to a boil.  Reduce the heat to a steady simmer (any more than a simmer will break the ravioli).
    2. Lay each of the wanton wrappers on a large flat surface.  Using a brush or your finger, wet the edges of half of the wrappers.  
    3. Place approximately 1 tbsp of the braised pork, with a bit of the braising liquid, on the ravioli with wet edges. 
    4. Place the remaining wanton wrappers over the pork, forming the ravioli.  Press down on the edges of each ravioli with your fingers to ensure that the edges stick together.  
    5. Use a fork to press down on the edges of each ravioli to form ridges.
    6. Place the ravioli in the pot of simmering water one at a time to ensure that they do not stick.  Cook until the ravioli float to the top of the water, approximately two minutes.  Carefully remove each ravioli from the pasta water with a slotted spoon.  Place 5 ravioli on each plate.
    7. As the ravioli cook, make the sauce by heating the butter over medium heat.  Once the butter has melted and begins to brown, remove it from the heat.  Stir in the sage leaves and lemon juice and taste for salt and pepper.  
    8. Pour a few spoonfuls of the brown butter sage sauce over the ravioli.  Top each plate with a small amount of grated Pecorino Romano.  Serve immediately. 

    Wednesday, August 11, 2010

    Deviled Pork Chops


     I probably make deviled pork chops every other week.  They take little more effort than plain old pan roasted pork chops, but carry loads more flavor thanks to a coating of dijon mustard and paprika. My recipe is a riff on a Mark Bittman recipe; mine has the addition of paprika and makes a more robust pan sauce than his.  Nonetheless, this is still very much a minimalist recipe and makes for a killer weeknight meal.  For the dish in the picture, I used boneless sirloin chops from Dickson's Farmstand Meats in New York's Chelsea Market, but any sort of pork chops will work just as well so long as you alter the cooking time accordingly.

    Deviled Pork Chops
    Serves 2

    Ingredients:
    • 2 boneless sirloin pork chops, 1" thick
    • Salt and pepper
    • 1 tsp paprika
    • 1 tbsp Dijon mustard
    • 2 tbsp olive oil
    • 1 shallot, minced
    • 1/4 cup dry white wine
    • 1/4 cup chicken stock
    • 1 sprig thyme
    Directions:
    1. Season the pork chops on both sides with salt and pepper.  Rub the paprika over the pork chops, then rub them all over with the Dijon mustard.  Set the chops aside.
    2. Heat the olive oil in a 12-inch skillet over medium-high heat.  Once the oil begins to shimmer, add the pork chops.  Cook the pork chops until they are well browned on both sides, about 2 minutes per side.  
    3. Reduce the heat to low and continue to cook the pork chops until they are cooked through, about 3 to 4 minutes per side.  Remove the pork chops to a plate and tent them with foil to keep them warm. 
    4. Increase the heat to medium-high and add the shallots.  Stir them them for 1 minute, then pour in the white wine.  Bring the wine to a boil, using the back of a wooden spoon to dislodge the brown bits at the bottom of the pan.  Let the wine boil until it is almost completely reduced, about 2 minutes.  Pour in the chicken stock and the thyme and bring the liquid to a boil.  Reduce the liquid until it has thickened to a desired consistency, 2 to 3 minutes.  Pour in any liquid that has accumulated on the plate with the pork chops.  Taste the pan sauce for salt and pepper. 
    5. Serve the pork chops immediately with the pan sauce drizzled over top. 

    Tuesday, July 27, 2010

    Char Siu: Vietnamese Roast Pork Shoulder


    Every Sunday, I try to find time to cook a large meal with enough leftovers so that I get to skip out on cooking dinner at least a few nights during the week.  During the cooler months, my go to Sunday night meals tend to be braises.  In the warmer months, I go for roast meats, and my absolute favorite roast meat is char siu, a Vietnamese dish consisting of strips of pork shoulder strips that are marinated in a sweet soy sauce mixture, then roasted at very high heat so that the pork on a beautiful reddish brown color.   Crispy on the outside, with a healthy dose of juicy pork fat interspersed throughout the meat, absolutely no other roast meat beats char siu.  Best of all, unlike the usual monotony that comes with leftovers, leftover char siu lends itself to a wide variety of uses; I have tried it by itself, mixed in with fried rice, and over a bed of noodles.  Each preparation reminded me why I love the dish so much. 


    Char Siu
    Adapted from Into the Vietnamese Kitchen

    Ingredients:
    • 2 lb. boneless pork shoulder, well trimmed
    • 2 cloves garlic
    • 2 tbsp sugar
    • 1/2 tsp Chinese five-spice powder
    • 3 tbsp Hoisin
    • 2 tbsp honey
    • 1 1/2 tbsp Shaoxing rice wine
    • 2 tbsp soy sauce
    • 1 tbsp double black (thick) soy sauce
    • 2 tsp sesame oil
    Directions:
    1. Quarter the pork lengthwise into 1 1/2 inch thick strips.
    2. Combine all of the remaining ingredients in a large bowl.  Add the pork to the marinade and cover.  Refrigerate overnight, turning the pork a few times as it marinates to ensure that all sides are well-covered in marinade. 
    3. Preheat the oven to 475F.
    4. Place a flat roasting rack on a baking tray lined with foil.  Place the pork on the roasting rack and place it in the oven.  
    5. As the pork roasts, baste it with the marinade every ten minutes and turn the pork.  Roast until the pork begins to char on the outside and is cooked through, about 35 minutes.  
    6. Remove the pork from the oven and let it rest for 10 minutes.  Using a sharp knife, slice the pork strips into very thin slices.  Serve the pork as desired. 

    Wednesday, May 19, 2010

    Brined Pork Tenderloin with Salsa Verde


    A recent visit to Williamsburg, Brooklyn, brought me to The Meat Hook, one of two hipster-run butchers--the other being Marlow and Daughters--that has recently opened in the neighborhood.  Although I lauded these new school butchers for their focus on selling locally-sourced meats and offering off-cuts that are difficult to find elsewhere, I remained skeptical of  young, hip, personable butchers, and with nary a scar on their arms.  Could the cool butcher's at The Meat Hook possibly be better than the gruff, old-school butchers from whom I am more accustomed to purchasing my meat?  There was only one way to find out.

    Staring at the wide array of sausages and cuts in the meat case, I had no idea what to purchase.  Slightly intimidated by the butcher, who not only was better-looking than I, but could also break down a whole hog in the time it takes me to chop a bunch of parsley, I blurted out "I'll have what she's having," unsure of whether the lady in front of me was more excited by the butcher or the tenderloin from locally-bred pork that he was trimming for her.  The kind butcher went to the meat locker, pulled out a tenderloin and began trimming it for me.  Five minutes later, I was on my way back to Manhattan, pork tenderloin in hand. 

    Once home, I prepared the pork as simply as I could.  I brined it using Thomas Keller's brine from Ad Hoc at Home in order keep the lean meat moist as it cooked.  I seared it and then roasted the tenderloin as per Keller's instructions and topped it with a refreshing salsa verde.  Alongside the pork, I served roasted asparagus topped with a poached egg.  

    The verdict? While the brine no doubt helped make the pork exceptionally juicy and tender, I have to commend my butcher at the Meat Hook, who sold me an excellent piece of meat.  Eddie - 0, Meat Hook Butcher - 1. 

    Brined Pork Tenderloin with Salsa Verde
    Serves 6

    For the Brine:
    • 1/4 cup plus 2 tbsp honey
    • 12 bay leaves
    • 3 rosemary sprigs
    • 1/2 bunch thyme
    • 1/2 bunch parsley
    • 1/2 cup garlic cloves, crushed
    • 2 tbsp peppercorns
    • 1 cup kosher salt
    • 8 cups water
    For the Salsa Verde:
    • 1 cup parsley leaves
    • 1/2 tsp red pepper flakes
    • 1/2 cup bread crumbs, toasted
    • 1 clove garlic, peeled and crushed
    • 1/2 cup olive oil
    • 2 tbsp lemon juice
    • salt, to taste
    For the Pork:
    • 2 1 lb. pork tenderloins
    • salt and pepper
    • olive oil
    • 2 tbsp butter
    • 2 garlic cloves, crushed
    • 6 thyme sprigs
    • 2 rosemary sprigs
    Directions:
    1. Make the brine a day ahead of cooking the pork.  Combine the honey, rosemary, thyme, parsley, garlic cloves, peppercorns, kosher salt, and water in a large pot and bring to a boil.  Boil the brine for two minutes, stirring it well to dissolve the salt.  Remove the pot from the heat and bring it to room temperature.  Place the brine in the refrigerator and let it cool overnight. 
    2. Place the pork tenderloins in the brine and refrigerate them for 4 hours.  
    3. Meanwhile, prepare the salsa verde.  Combine the parsley leaves, bread crumbs garlic, and pepper flakes in the bowl of a food processor.  Pulse the mixture a few times until the ingredients are chopped and well-combined.  Then, slowly pour in the olive oil while running the food processor.  Blend until a smooth paste forms.  Stir in the lemon juice and taste for salt.  Set the salsa verde aside or refrigerate it for a later use.
    4. Preheat the oven to 350F.
    5. Remove the pork from the brine.  Rinse it off and pat it dry with paper towels.  Season the pork with salt and pepper.
    6. Heat the olive oil in a large skillet over medium-high heat.  Add the pork and until it is well-browned on all sides, about 6 minutes.
    7. Add the butter, garlic, thyme, and rosemary to the pan and cook for another 2 minutes, turning the pork frequently and basting it with the butter.
    8. Transfer the pork to a roasting rack.  Place it in the oven and cook until it is cooked through, about 20 minutes.  Remove the pork to a plate and tent it with foil.  Let the pork rest for 15 minutes.
    9. Slice the pork on the bias into 3/4-inch slices.  Serve it with the salsa verde. 

    Monday, March 22, 2010

    Fresh Pancetta

    http://www.culinary-studio.com/2010/03/spaghetti-allamatriciana.htmlI have always considered dabbling in charcuterie for this blog, but thought that it was maybe slightly impractical; after all, I do live in a studio.  As with most things in the kitchen, practicality failed to keep me down for long.  This week, I took my first stab at cured meats, making a "fresh" pancetta. Yes, fresh charcuterie-- not quite the real deal, but for me, it was a big first step towards the land of salt-preserved pig parts.  Fresh pancetta is simple to make, and it is a perfect substitute for the real deal in recipes.  Step by step instructions for making fresh pancetta follow.

    First, take a large piece of pork belly.  If you can find it, use a skin-on pork belly; I used skinless.


    Then, cover the pork belly in a light coating of salt:


     Next, place the pork on a large plate or rimmed baking wrap and cover the it with plastic wrap.  Refrigerate it for 3 days.  The salt should dissolve into the meat after a day or so:

    Preheat the oven to 325F.  After 3 days in the refrigerator, pat the pork dry with paper towels.  Place it on a rimmed baking sheet (if you refrigerated the pork on a baking sheet, dry it off).  Cook the pork until it is soft and nearly fork tender; depending on the size of the pork belly this will take from an hour to an hour and a half:


    Let the pancetta cool, then wrap it in plastic wrap.  If you used a skin-on pork belly, peal the skin off with your fingers.  Refrigerate the pancetta for up to two weeks or portion it into smaller servings and freeze them for up to 6 months.  Enjoying it in dishes such as spaghetti all'Amatrician:

    Monday, November 23, 2009

    Pulled Pork Made in the Oven

    For a recent office potluck, I decided to honor my Southern heritage by cooking pulled pork. While there is no substitute for wood smoked pork butt, this recipe for beer braised pork butt is as good as any pulled pork dish that can easily be cooked in a New York apartment. If the number of requests I received from my co-workers is any indication, they agreed. The recipe is quite simple, it just takes the better part of an evening to make.

    First, rub the bone-in pork butt in the spice mixture. A store-bought spice rub will do, but it's best if you make your own. The rub prescribed in the recipe lends the meat a smoky flavor that gives the dish slight semblance to authentic smoke pork. Let the pork marinate for at least an hour, preferably overnight. Before you are ready to cook the pork, let it come to room temperature.


    Next, preheat the oven to 500F. Roast the pork until the pork blackens.


    Remove the pork from the oven and reduce the heat to 325F. While the oven is cooling down, pour a 12 oz. dark beer over the pork and have one for yourself. I used Peak Organics Brown Ale. Surround the pork with several cloves of minced garlic. Finally cover it with heavy foil and poke several holes all over the foil to let some liquid escape. Let the pork braise until it is falling off the bone, about 2.5 hours. Remove the pork from the roasting pan and pour the braising liquid into a sauce pan.

    Perfecting the braising liquid is key here as it will make for wonderfully moist meat. Add the ketchup, Worchestershire sauce, brown sugar, and dijon mustard to the liquid and let it simmer for about 20 minutes. Meanwhile, shred the pork with two forks:


    Finally, mix as much of the liquid as desired back into the pork. It will look like too much liquid, but keep stirring it into the pork, as the meat will absorb lots of the braising liquid.


    Serve the rest of the braising liquid with the pork. The pork is delicious by itself or a sandwich on a potato roll with cole slaw.

    Monday, November 16, 2009

    Braised Pork Shoulder with Cardamom & Ginger

    Cooking can be at its most fun when you don't give a damn. It can also be at its most educational. With a good combination of ingredients and good technique, a recipe doesn't need to offer any more than a little inspiration. This pork dish was inspired by a recipe I came across in Molly Stevens' All About Braising, while looking for ways to cook a pork shoulder roast I had purchased at Whole Foods. Stevens' recipe called for dried apricots to be added to the sauce, but being the lazy Sunday that it was, I decided against a second trip to the store to purchase apricots. Eventually, my straying from Stevens' recipe turned into all-out rebellion. It's a very loose interpretation of the original recipe, but it worked and I had fun preparing it.

    Braised Pork Shoulder with Cardamom & Ginger
    Serves 6

    Ingredients:

    • 1 5 lb boneless pork shoulder roast, trimmed and tied with butcher's twine into a neat log
    • 1 tbsp ginger, minced
    • Salt and pepper, to taste
    • 2 tbsp olive oil
    • 1 yellow onion, finely chopped
    • 2 carrots, finely chopped
    • 2 celery stalks, finely chopped
    • 3 garlic cloves, minced
    • 1 tbsp ground cardamom
    • 1/2 tsp ground turmeric
    • 1.4 tsp ground cayenne pepper
    • 1 bay leaf
    • 2 tbsp brandy
    • 1/2 cup dry vermouth
    • 2 cups chicken broth
    • 1/4 cup cilantro leaves, minced
    Directions:

    1. Preheat the oven to 300F.
    2. Pat the pork dry with paper towels and generously season it with salt and pepper.
    3. Heat the oil in a dutch over over medium heat. Add the pork and cook until well browned on all sides, approximately 20 minutes. Remove the pork to a plate.
    4. Pour off all but 1 tbsp of fat from the pan. Add the onion, carrot, celery, garlic, and cardamom, turmeric, and cayenne and cook until the vegetables soften and the spices are fragrant, about 5 minutes.
    5. Add the ginger and bay leaf to the pan and cook for another two minutes.
    6. Pour in the brandy and stir with a wooden spoon to stir up the brown bits on the bottom of the pan. Boil until the brandy is reduced by half, about 1 minute.
    7. Add the vermouth to the pan and cook until reduced by half, about 4 minutes.
    8. Stir in the stock and bring to a slow simmer.
    9. Add the pork to the dutch oven. Baste the pork with the braising liquid and cover the dutch oven. Place in the oven. Every 30 minutes, turn the pork and baste it with the braising liquid. Cook until the pork is very tender, approximately 2 hours.
    10. Remove the pork from the dutch oven and let it rest on a plate for at ten minutes. Meanwhile, keep the braising liquid at a simmer. The liquid should not be thick, but if it appears too watery, boil it for a few minutes until it reaches its desired consistency. Taste it for salt and pepper.
    11. Serve the pork with the braising liquid spooned on top and garnished with the cilantro.

    Tuesday, November 3, 2009

    Pork Ribs Braised in Vietnamese Caramel Sauce


    The most important ingredient of this rich pork braise is the bittersweet Vietnamese caramel sauce, which gives the braising liquid its dark hue and robust flavor. The key to a perfect caramel sauce is to brown the sugar just shy of the point at which it becomes a black, burnt mess and ruins your pan. As frightening as that may sound, I highly recommend following Andrea Nguyen's recipe and technique for making caramel sauce, which can be found here, along with some extremely helpful photos.

    Once you have made the caramel sauce, rest of the recipe will be easy, albeit somewhat time consuming with the marinading and braising time. Although the it calls calls for country cut pork ribs, I would think it would work equally well with other fatty cuts of pork, dark meat chicken, or beef; just adjust the braising time accordingly.

    Pork Ribs Braised in Caramel Sauce
    Adapted from Andrea Nguyen's Into the Vietnamese Kitchen

    Ingredients:

    • 3 lbs country cut pork riblets (ask your butcher to cut the whole ribs crosswise through the bone into long strips)
    • 1 small yellow onion, finely chopped
    • 1 tbsp sugar
    • 1 tsp ground black pepper
    • 6 tbsp fish sauce
    • 6 tbsp caramel sauce (recipe here)
    • 1 cup water, plus more if needed
    Directions:

    1. Trim the ribs of any excess fat.
    2. In a large bowl, mix the onion, sugar, pepper, and 3 tablespoons of the fish sauce. Add the riblets and stir well to coat with the marinade. Refrigerate overnight.
    3. Preheat the broiler. Remove the riblets from the marinade (reserve the marinade) and broil until browned on each side, about 9 minutes per side. Set aside on a plate.
    4. Place the riblets in a braising dish or a large skillet with deep sides. Add any juices that have collected on the plate, along with the reserved marinade, caramel sauce, and remaining fish sauce. Pour in enough water to cover the riblets by two-thirds.
    5. Bring the braising liquid to a boil, then reduce to a gentle simmer and cover. Cook for 45 minutes. Uncover the braising dish and turn the ribs. Increase the heat to a vigorous simmer and continue to cook uncovered for 20 minutes or until the pork is very tender. Serve with steamed rice.

    Thursday, October 8, 2009

    Tom Colicchio's Braised Pork Belly

    I thought that the best way to show my appreciation for Tom Colicchio after he kindly answered my questions was to cook one of his signature recipes. His recipe for braised fresh "bacon" in Think Like a Chef helped bring the pork belly craze into home kitchens. As simple as the dish is to prepare, it is certainly restaurant-quality. I served it with Chef Colicchio's lentils, celebrating the beginning of autumn in New York.


    Braised Pork Belly
    Serves 4

    Ingredients:
    • 1 Tbsp olive oil
    • Salt and pepper, to taste
    • 2 lbs. pork belly, preferably with skin on
    • 1 onion, chopped
    • 2 carrots, peeled and chopped
    • 2 celery stalks, chopped
    • 1 leek, white part only, chopped
    • 2 garlic cloves, peeled and smashed
    • 3 cups chicken stock

    Directions:
    1. Heat of to 350F.
    2. Pat dry the pork belly with a paper towel and season with salt and pepper.
    3. Heat oil in a large skillet over medium heat. Add pork, skin side down, and cook until well browned, about 15 minutes. Set pork aside.
    4. Pour off all but 2 tbsp fat and add onion, carrots, celery, leek, and garlic. Stir to coat the vegetables with oil. Cook, stirring occasionally, until the vegetables are soft, about 20 minutes.
    5. Add pork belly to the pan along with 2 cups of chicken stock. Bring to a simmer, then transfer the skillet to the oven. Cook, uncovered, for 1 hour.
    6. Add the rest of the stock and cook until pork is tender, approximately 1 hour.
    7. Remove the skillet from the oven and let the pork cool. Once cooled, remove the skin with your fingers and discard or eat it. Score the fat, then cut the pork into 4 pieces.
    8. Increase the oven heat to 400F.
    9. Strain the braising liquid, discarding the solids, and return the liquid to the skillet. Bring the liquid to a simmer and skim off any fat.
    10. Return the pork, fat-side up, to the skillet. Transfer the skillet to the oven and cook until the fat is browned, about 20 minutes. Serve immediately.

    Tuesday, August 18, 2009

    Larb: A Perfect Dish for Summer

    Larb may be a dish from Northern Thailand and Laos, but I can't help but wonder if its creators invented the dish knowing that many years later, inhabitants of New York would need some refreshing and hearty dishes to get them through their hot summers. Simple to prepare and best at room temperature, larb, bursting with the refreshing flavors of lime, galangal, fish sauce, cilantro, and mint, really is a perfect dish for a hot summer night.

    The most difficult part of making larb is purchasing the ingredients, which will definitely require a trip to a well-stocked Asian market, and preferably one that serves a Thai or Lao clientele. While you're there, buy fish sauce, galangal, lime leaves, and roasted rice powder. The good news is that you will get to make many more larbs before you need to return (store the lime leaves and the galangal in the freezer). I cheated and used some powdered galangal that I already had on hand:


    The remaining ingredients can be purchased at any store: oil, ground pork, mint, cilantro, red pepper flakes, and lime juice. Cook the pork in a skillet, mix it in a bowl with the remaining ingredients, and serve it with jasmine or sticky rice, and some summer rolls. The below recipe is a simplified larb recipe adapted from Penn Hongthong's Simple Lao Cooking, but the Significant Eater, who grew up eating plenty of larb herself, proclaimed its flavors just as authentic as the real deal.


    Larb Moo (Pork Larb)
    Serves 4

    Ingredients:
    • 1 lb. ground pork
    • 1 tbsp. peanut oil
    • juice from 1 lime
    • 1/2 tsp salt
    • 1 1/2 tbsp fish sauce
    • 1/2 tsp crushed red pepper
    • 1 tbsp galangal, minced, or 1 tsp ground galangal
    • 2 kaffir lime leaves, minced
    • 1 tbsp roasted rice powder
    • 1 tbsp lemongrass, minced
    • 2 scallions, minced
    • 1/2 cup cilantro, chopped
    • 1/2 cup mint, chopped
    Directions:
    1. Heat oil in a wok over medium heat. Add pork and cook until no longer pink, 5 to 7 minutes.
    2. Set pork in a bowl and let cool for at least 10 minutes.
    3. Mix pork with remaining ingredients and serve with rice.

    Wednesday, July 1, 2009

    Honey-Glazed Pork Chops

    As may be clear by the reduced frequency of my blog posts, I have been in a culinary creativity slump this week. I've stuck to simple, tried-and-true recipes, many of which I've posted on this very blog. My only new recipe was a this one for honey-glazed pork chops from Food and Wine. While the recipe was by no means inspiring enough to get my culinary juices flowing again, it added just enough excitement to a wonderful bone-in Berkshire rib chop I had in my freezer. Fortunately, with Independence Day weekend around the corner, I have lots of exciting restaurant outings planned for the next few days; perusing the menus of great restaurants is always the best way for me to recover from a slump in the kitchen.

    Tuesday, June 16, 2009

    The Greenmarket Challenge: Day 8

    Rather than supplementing my Greenmarket purchases with purchases from the supermarket as I usually do, I bough all of my purchases from the Greenmarket this week. I set myself a budget of $110, which is only slightly more than what I normally spend for two weeks of groceries. Keep in mind that this budget will cover my breakfasts, lunches, and dinner for the next 12 days; that's $11 a day, a fair budget considering my average lunch in midtown Manhattan is $8. I have allowed myself some leg room to use ingredients such as grains, sauces, and garlic that I already had on hand, but other than that necessary allowance, my entire diet for the week will consist of local foods. Follow along with me as I document local my meals over the next twelve days of my Greenmarket Challenge.

    Day 8

    Breakfast: Strawberries, yogurt, and honey

    Lunch: Spinach salad with hard boiled Knoll Crest egg, sugar snap peas, and roasted asparagus

    Dinner: Roast spare ribs from Flying Pigs Farm, sauteed kale with onions, polenta

    As if I didn't already get my pork fix at the Big Apple Barbecue Block Party this weekend, I decided to cook my spare ribs from Flying Pigs Farm for the eighth day of my Greenmarket Challenge. I chose this meal more out of necessity-- the ribs were the only meat from the Greenmarket remaining in my refrigerator-- than out of a desire for more pork fat. Nonetheless, they made for an excellent dinner, with the Italian-ish spice mixture I rubbed on them making these ribs very different from the sweet and spicy pork I had stuffed my face with all weekend.

    I rubbed the spare ribs with a mixture of salt, pepper, and sage, and roasted them at 325F for 75 minutes. Unfortunately, my camera battery died at the dinner table, so I have no pictures to commemorate the 8th day of the Greenmarket Challenge.

    Thursday, June 4, 2009

    Pork Chops with Soy and Sriracha Pan Sauce

    One of the first cooking techniques I learned was how to make a basic pan sauce: deglaze pan with alcohol, add liquid and seasonings, and reduce. Due to both the simplicity and versatility of pan sauces, they have become one of my standard go to's when cooking simple meals during the week. I have also found that a pan sauce lends itself well to improvisation; just about any tasteful combination of liquids and seasonings can make a great pan sauce as long as you follow the basic technique.

    Tonight was one such pan sauce experiment that turned out nicely. The combination of soy sauce, sriracha, and hoisin rarely fails, so I decided to turn it into a pan sauce to accompany pork chops. I added garlic and ginger to season the sauce, and some sugar to slightly sweeten the sauce and to help it thicken. To keep with the Asian theme, I used shaoxing rice wine to deglaze the pan, but dry sherry would work just as well. The measurements are by no means exact, so add or subtract according to your taste; remember, a pan sauce lends itself to improvisation.

    Pork Chops with Soy and Sriracha Pan Sauce
    Serves 2

    Ingredients:
    • 2 thick bone-in pork chops
    • Salt and pepper
    • 2 tbsp peanut oil
    • 1 large clove of garlic, minced
    • 1/2 inch piece of ginger, minced
    • 1/4 cup shaoxing (Chinese rice wine) or sherry
    • 1/4 cup soy sauce
    • 1 tbsp sriracha sauce
    • 1 tbsp hoisin sauce
    • 2 tsp sugar
    Directions:
    1. Pat pork chops dry with paper towels. Season with salt and pepper.
    2. Heat oil in a deep skillet over medium-high heat.
    3. Add pork chops to pan. Cook for about two minutes per side. Reduce heat to low, cover skillet, and continue to cook pork chops until cooked through, about 3 more minutes per side. Remove chops from pan and let rest.
    4. Increase heat to medium. Add garlic and ginger to pan and cook until fragrant, about 1 minute.
    5. Add wine to pan and bring to a boil. Reduce by half, about 2 minutes. Reduce heat to low.
    6. Add soy sauce, hoisin, sriracha, and sugar to pan. Simmer until thickened, about two minutes.
    7. Serve pork chops over rice with pan sauce.

    Sunday, April 5, 2009

    Braised Pork Chops and Cabbage


    Last night, I made this simple recipe for braised pork chops with cabbage from Molly Stevens' All About Braising. Cabbage goes extremely well with pork dishes, and this one is no exception.

    Braised Pork Chops and Cabbage
    Serves two

    Ingredients:
    • 2 thick bone-in pork chops
    • Salt and pepper
    • Flour, for dredging
    • 2 Tb olive oil
    • 2 Tb butter
    • 1 tsp. celery seeds
    • 1 tsp. mustard seeds
    • 1 shallot, sliced
    • 1/2 head of green cabbage, leaves sliced into thin strips
    • 1/2 cup dry vermouth
    • 2/3 cup chicken broth
    • 1 Tb. cider vinegar
    • 1/4 cup heavy cream
    Directions:
    1. Season pork chops with salt and pepper. Dredge both sides with flour.
    2. Heat olive oil in deep skillet over medium high-heat. Add pork chops and cook until brown on both sides, about four minutes per side. Remove pork chops to plate.
    3. Melt butter in skillet over medium heat. Add the mustard and celery seeds until they begin to pop, about one minute.
    4. Add shallots to skillet and cook until soft, a couple of minutes.
    5. Add cabbage to skillet and season with salt and pepper. Reduce the heat to medium-low and cook until cabbage wilts, about 10-15 minutes, stirring occasionally.
    6. Add vermouth and let simmer for a couple of minutes. Add stock and vinegar to skillet and bring to simmer.
    7. Add pork chops to skillet and cover. Cook for abouth 20 minutes or until pork is cooked through, turning once.
    8. Once pork is cooked, transfer to plate. Add cream to skillet and bring to a slow boil. Cook until cabbage is creamy, about 5 minutes. Spoon cabbage over pork chops and serve.


    Tuesday, March 17, 2009

    Carnitas


    During the week, I rarely have much time or energy to cook anything more than the simplest of dishes. For this reason, I tend to spend my Sunday nights tending to a braised dish on the stove or a roasted meat in the oven. This Sunday, I prepared carnitas, a Mexican dish consisting of cubed pork butt that is braised in spices until all of the liquid evaporates, and then fried in it's own fat (hey, I ran 15 miles this weekend!). The nice thing about carnitas is that it is so versatile. Having researched a number of recipes, I found that nearly anything combination of ingredients can be used so long as the basic technique is followed. Realizing that it was not necessary to follow a recipe, I decided to make my own, and I was proud of the result, which follows. In order to use up some the lager I bought for the pork, I served the carnitas with Drunken Beans made with Rancho Gordo vaqueros.


    Carnitas

    Ingredients:
    • 3 lb. pork butt, cut into 1.5 inch chunks
    • 2 yellow onions, chopped
    • 4 cloves garlic, minced
    • 1 poblano pepper, chopped
    • 1 chipotle pepper in adobo, minced
    • Juice of 1 orange
    • Juice of 1 lime
    • 1 Tb cumin ground
    • 2 tsp. dried ancho pepper, ground
    • 1 Tb dried marjoram
    • Salt, for seasoning
    • 12 oz. lager beer
    • Cilantrol leaves, for serving
    • Lime wedges, for serving
    • Tomatillo salsa, for serving
    Directions:
    1. Add first 11 ingredients (up to the salt) to a large dutch oven. Marinate for several hours.
    2. Pour in beer and add water to barely cover pork. Simmer pork over moderate heat until meat easily falls apart, approximately 2 hrs.
    3. Increase heat to medium-high and continue to cook until liquid has completely reduced, another hour and a half.
    4. Once the only remaining liquid is the pork fat, watch pork carefuly. Cook the pork cubes or shreds, turning occasionally, until brown and crispy.
    5. Serve pork over rice or in warmed toritillas. Garnish with cilantro and serve with salsa.

    Tuesday, November 18, 2008

    Spice Braised Nyonya Pork

    Spice Braised Nyonya Pork

    Towards the end of my trip to the Greenmarket this past Saturday, a rainstorm forced me to seek shelter in Whole Foods. Soaking wet with a backpack and totebag full of local goodies, a very non-local vegetable caught my eyes: fresh galangal from Hawaii. Fresh galangal? At Whole Foods? I thought that was something that was only found in Chinatown, and usually frozen at that. I knew that it was an omen, so I picked up a four inch piece of galangal along with a handful of fresh thai peppers (another “At Whole Foods?” moment for me).

    When I returned home, I immediately pulled out the cookbook that I had in mind when I spotted the galangal: James Oseland’s Cradle of Flavor. The book is full of delicious recipes from the Spice Islands, but I do not get to cook from it very often since nearly every recipe requires a trip to Chinatown to pick out ingredients such as fresh turmeric, kaffir lime leaves, and, yes, galangal. This time, I at least had one ingredient on hand without having to treck down to Mott St.

    The recipe I picked out was Spice Braised Nyonya Pork. Pork butt sauteed with galangal and a paste of shallots, then braised with water, sugar, double black soy sauce, rice vinegar, cinnamon, cloves, and star anise. All of this is reduced until the sauce just barely coats the meat. It ain’t local, but it sure was delicious!

    Tuesday, July 15, 2008

    Molly Stevens’ Sausages and Plums Braised in Red Wine


    To celebrate my girlfriend’s long-awaited move to New York, I found this recipe from Molly Stevens’ All About Braising: The Art of Uncomplicated Cooking. I braised sausages and plums in red wine, and like every other recipe I have tried from the cookbook, it did not let me down. It was a very simple braise that filled my apartment with aromas of sweet italian sausage, sage, and red wine. The recipe can be found here.

    Friday, July 11, 2008

    Pork Tonkatsu

    I’m still alive! After spending last week on vacation in Florida, I have been busy catching up on work and my workouts, and have had little time to cook or post. My cupboard and refrigerator are pretty empty, so I have been living mostly off of leftovers this week. I did, however, find some Berkshire pork cutlets in my freezer, so I prepared pork tonkatsu, a simple japanese dish of panko-breaded pork with a sweet and sour sauce.

    I prepared the pork using the tonkatsu recipe from Mark Bittman’s The Best Recipes in the World. It’s very easy: season the pork, dredge in flour, dip it in beaten eggs, and coat it with panko. Shallow fry for 3 minutes per side. Serve with a sauce consisting of equal parts dijon mustard, mirin, and soy sauce, and slightly less rice vinegar. I served the pork with roasted potatoes and stir fried kale. Sorry, no picture due to poor lighting.

    Now that this hectic week is almost over, I’ll I can make my return to the kitchen (and the blog).

    LinkWithin

    Related Posts with Thumbnails