Showing posts with label Thomas Keller. Show all posts

Wednesday, May 19, 2010

Brined Pork Tenderloin with Salsa Verde


A recent visit to Williamsburg, Brooklyn, brought me to The Meat Hook, one of two hipster-run butchers--the other being Marlow and Daughters--that has recently opened in the neighborhood.  Although I lauded these new school butchers for their focus on selling locally-sourced meats and offering off-cuts that are difficult to find elsewhere, I remained skeptical of  young, hip, personable butchers, and with nary a scar on their arms.  Could the cool butcher's at The Meat Hook possibly be better than the gruff, old-school butchers from whom I am more accustomed to purchasing my meat?  There was only one way to find out.

Staring at the wide array of sausages and cuts in the meat case, I had no idea what to purchase.  Slightly intimidated by the butcher, who not only was better-looking than I, but could also break down a whole hog in the time it takes me to chop a bunch of parsley, I blurted out "I'll have what she's having," unsure of whether the lady in front of me was more excited by the butcher or the tenderloin from locally-bred pork that he was trimming for her.  The kind butcher went to the meat locker, pulled out a tenderloin and began trimming it for me.  Five minutes later, I was on my way back to Manhattan, pork tenderloin in hand. 

Once home, I prepared the pork as simply as I could.  I brined it using Thomas Keller's brine from Ad Hoc at Home in order keep the lean meat moist as it cooked.  I seared it and then roasted the tenderloin as per Keller's instructions and topped it with a refreshing salsa verde.  Alongside the pork, I served roasted asparagus topped with a poached egg.  

The verdict? While the brine no doubt helped make the pork exceptionally juicy and tender, I have to commend my butcher at the Meat Hook, who sold me an excellent piece of meat.  Eddie - 0, Meat Hook Butcher - 1. 

Brined Pork Tenderloin with Salsa Verde
Serves 6

For the Brine:
  • 1/4 cup plus 2 tbsp honey
  • 12 bay leaves
  • 3 rosemary sprigs
  • 1/2 bunch thyme
  • 1/2 bunch parsley
  • 1/2 cup garlic cloves, crushed
  • 2 tbsp peppercorns
  • 1 cup kosher salt
  • 8 cups water
For the Salsa Verde:
  • 1 cup parsley leaves
  • 1/2 tsp red pepper flakes
  • 1/2 cup bread crumbs, toasted
  • 1 clove garlic, peeled and crushed
  • 1/2 cup olive oil
  • 2 tbsp lemon juice
  • salt, to taste
For the Pork:
  • 2 1 lb. pork tenderloins
  • salt and pepper
  • olive oil
  • 2 tbsp butter
  • 2 garlic cloves, crushed
  • 6 thyme sprigs
  • 2 rosemary sprigs
Directions:
  1. Make the brine a day ahead of cooking the pork.  Combine the honey, rosemary, thyme, parsley, garlic cloves, peppercorns, kosher salt, and water in a large pot and bring to a boil.  Boil the brine for two minutes, stirring it well to dissolve the salt.  Remove the pot from the heat and bring it to room temperature.  Place the brine in the refrigerator and let it cool overnight. 
  2. Place the pork tenderloins in the brine and refrigerate them for 4 hours.  
  3. Meanwhile, prepare the salsa verde.  Combine the parsley leaves, bread crumbs garlic, and pepper flakes in the bowl of a food processor.  Pulse the mixture a few times until the ingredients are chopped and well-combined.  Then, slowly pour in the olive oil while running the food processor.  Blend until a smooth paste forms.  Stir in the lemon juice and taste for salt.  Set the salsa verde aside or refrigerate it for a later use.
  4. Preheat the oven to 350F.
  5. Remove the pork from the brine.  Rinse it off and pat it dry with paper towels.  Season the pork with salt and pepper.
  6. Heat the olive oil in a large skillet over medium-high heat.  Add the pork and until it is well-browned on all sides, about 6 minutes.
  7. Add the butter, garlic, thyme, and rosemary to the pan and cook for another 2 minutes, turning the pork frequently and basting it with the butter.
  8. Transfer the pork to a roasting rack.  Place it in the oven and cook until it is cooked through, about 20 minutes.  Remove the pork to a plate and tent it with foil.  Let the pork rest for 15 minutes.
  9. Slice the pork on the bias into 3/4-inch slices.  Serve it with the salsa verde. 

Tuesday, May 11, 2010

Thomas Keller's Ad Hoc Meatballs


Meatballs are all the rage in New York these days, appearing on menus all over city.  Hell, there's even The Meatball Shop, a Lower East Side restaurant dedicated to all things meatball.  Naturally, I decided to make meatballs at home this past weekend using Thomas Keller's recipe from  Ad Hoc at Home.  Why leave my apartment for meatballs when I could make my own using a recipe from one of the best chef's in the country? 

It's hard to pinpoint exactly what makes the Ad Hoc meatballs so great.  The mixture is fairly traditional: ground chuck, sirloin, pork, and veal, an egg, breadcrumbs, parsley, sauteed garlic and onions, salt and pepper.  I suspect it's the combination of ground meats that makes the difference, giving each meatball the perfect fat ration. 


 One of the key touches to Keller's meatballs is a small cube of fresh mozzarella cheese that gets inserted into the middle of each meatball prior to cooking them.


In my limited meatball experiences, I have only braised them in tomato sauce.  Keller's are roasted at 425F.  I was concerned that roasting at a high temperature would dry out the meatballs, but the combination of meats and cheese keeps these quite moist.  As anal as Keller supposedly is in the kitchen, I'm sure he would discard any meatball that springs a mozzarella leak, but I think it just makes it more enticing.  Significant Eater actually insisted on being served this one. 


I topped Keller's meatballs with Marcella Hazan's classic tomato-butter sauce, making it a old school meets new school meal. 

Sunday, April 4, 2010

How to Cook a Duck Breast

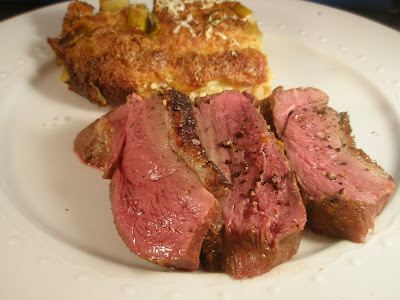
For many home cooks, duck is one of the more intimidating proteins to cook, a meat that most believe is best relegated to restaurant kitchens.  In reality, a duck breast is just as easy to cook as a chicken breast.  But if you follow the instructions I have laid out for cooking duck breast below, you can ensure that you will consistently have perfectly cooked duck, with crispy skin on the outside and medium-rare meat on the inside.

The first order of business when cooking a duck is to trim away any skin that overlapping the meat.  Next, you want to score the skin in a crosshatch pattern as I have done below.  Leave about a 1/4 inch between slices of the knife, and be very careful not to cut into the meat.  The crosshatch pattern will ensure that the skin crisps up as the duck cooks.  Once you have scored the skin, pat the duck dry with paper towels. 

Now, for the seasoning.  If you are going to make a sauce to serve with the duck, the duck needs little more than salt and pepper on both sides.  However, I prefer to serve duck sauceless, letting the rich  flavors of the duck meat stand out on their own.  Using a recipe from Thomas Keller's Ad Hoc at Home, I simply marinated my duck breast in a seasoning of orange zest, nutmeg, thyme, bay leaves, salt and pepper, and a splash of balsamic vinegar.


Once you are ready to cook the duck breast, preheat the oven to 400F.  Depending on how many duck breasts you are cooking, use a large skillet or two large skillets that will comfortably hold the duck breasts with plenty of room to move them around as they cook.  Add just enough canola oil to coat each skillet and heat the oil over medium-low heat.  Add the breasts to the pan, skin-side down.  Let them cook until the skin is nicely browned and crispy, about 17 to 20 minutes.  Periodically check on the doneness of the skin and move the duck breasts to different parts of the pan to ensure that they evenly cook.  Also, occasionally pour out the fat that collects in the pan so that there is always no more than 1/4-inch of fat in the skillet.  Duck fat is delicious to cook with, so save it for a later use.

Once the skin is cooked, flip the breasts and sear the meat side for a minute.  Flip the duck breasts once again so that they are skin-side down in the pan. Finally, pop each skillet into the 400F oven and cook the duck breasts until they are medium-rare, about 5 minutes.  Remove the duck breasts from the oven and place them on a plate.  Tent the plate with foil and let the duck breasts rest for 5 to 10 minutes to allow them to reabsorb the meat juices.  Slice each duck breast against the grain into thin slices and serve them immediately. 

Tuesday, December 29, 2009

The Multitude of Roast Chicken Recipes

It seems that the simpler something is, the more methods of doing it there are.  This is definitely the case of roast chicken, for which there seems to be a countless number of methods, 90% of which work.  I’ve tried stuffing the chicken with lemons a la Marcella Hazan, trussing it, leaving it untrussed, roasting at high heat, roasting at two temperatures, rubbing the bird with butter, rubbing it with just salt… you get the point.  Nearly all of those methods have turned out well. 


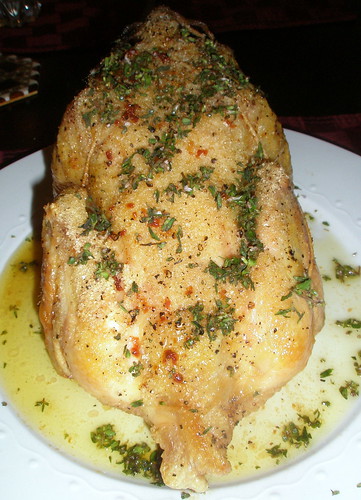
Thomas Keller alone has printed two methods of simply roasted in chicken in his cookbooks.  Up until now, my standby roast chicken recipe had been this one from the Bouchon cookbook in which a trussed chicken is seasoned only with salt and roasted at 450F for 45 minutes. Keller's latest cookbook, Ad Hoc at Home, contains yet another, completely different recipe for roast chicken.  In the more complicated Ad Hoc incarnation, the chicken is stuffed with garlic and thyme, trussed, seasoned with salt and pepper, rubbed with canola oil, and topped with butter (which I might add, blatantly disobeys his instructions in the Bouchon recipe), then roasted over a bed of root vegetables.  Additionally, unlike the single oven temperature in the Bouchon recipe, the Ad Hoc recipe calls for roasting the chicken first at 475F for 25 minutes, then at 400F for 40 minutes. 

So, what gives? Did Keller have some sort of roast chicken enlightenment between writing his two books?  Is one method better than the other?  You be the judge:


First, a chicken I roasted using the Ad Hoc at Home method the other week:


Now, here is a chicken I roasted using the Bouchon method a while back:


The Ad Hoc method may look better due to the extra browning, but both chickens were very tasty.  Without eating them at the same time, I can't say which one was better, although I will probably stick to the Bouchon method most nights for its quicker execution.  I just look at them both as two very good methods of producing the same simple thing.  


What is your favorite method of roasting chicken?

Monday, December 21, 2009

Thomas Keller's Ad Hoc Fried Chicken

I may not have found much time to blog the last few weeks, but that didn’t stop me from caving into a recent fried chicken craving. It must have been all of the praise on the blogosphere for Thomas Keller’s buttermilk fried chicken recipe from his latest cookbook, Ad Hoc at Home, for I just could not resist making a mess of my kitchen and giving Chef Keller’s recipe a spin of my own. The mess I created and the calories I ingested were well worth it, as the fried chicken was easily the best fried chicken I have ever had. The recipe can be found all over the Internet at this point (here’s one place to find it), so I won’t type it up again, but it is worth expanding on exactly what makes Thomas Keller’s fried chicken so perfect. What I love about his recipes, as complicated and precise as they may be, is that every ingredient and every step serve a clear purpose. There are three keys to his fried chicken recipe that make it the crispiest and most succulent fried chicken I have ever tasted:
  • The Brine: Have you ever wondered why restaurant chicken and pork is so much more juicy and so much more flavorful than what you cook at home, even when you purchase the best locally-produced, pasture-raised, all-organic, massaged-by-Cretan-virgins meat you can find? It’s not because the cooks have some magic up their sleeves. Often, it’s the restaurant is using a simple flavoring technique that you can just as easily use at home: brining. By soaking the meat in a brine for 12 hours prior to cooking it, the muscle cells will absorb the liquid of the brine via osmosis. In non-scientific words, a brine makes for supremely juicy meat. Keller does one better by adding lemon halves, thyme, parsley, garlic, and honey to the brine; the chicken soaks up all of those flavors making Keller’s fried chicken reach that pinnacle of fried birds where the meat is as delicious as the crust.
  • The Crust: To ensure an exceptionally crispy and flavorful crust, Keller instructs us to dredge the chicken in two layers of seasoned flour (with buttermilk between the two layers). The key to this technique is to make sure that you shake off the excess coating so that the crust on the chicken is crispy but not too thick. Keller spikes his flour with paprika, cayenne, garlic powder, and onion powder, which all lend the crust a nice bite.
  • The Buttermilk Coating: Like many fried chicken recipes, Keller’s calls for coating the chicken pieces in buttermilk. Although the chicken has already been brined, the buttermilk coating acts almost as a second brine, sealing in all of the chicken’s juices to ensure that very little moisture escapes as it is cooked.

What I love about Thomas Keller’s recipes, as complicated and precise as they may be, is that every ingredient and every step serve a clear purpose. The Ad Hoc at Home recipe may take more time and effort to make than your average fried chicken, but in carrying it out, you will perfect the three pillars that produce the ultimate fried chicken.

LinkWithin

Related Posts with Thumbnails